
a collection of notes on areas of personal interest
- Introduction
- Arabic / Islamic design
- Arabic / Islamic geometry 01
- Arabic / Islamic geometry 02
- Arabic / Islamic geometry 03
- Arabic / Islamic geometry 04
- Islamic architecture
- Islamic urban design 01
- Islamic urban design 02
- Islamic urban design 03
- Islamic urban design 04
- Islamic urban design 05
- Arabic / Islamic gardens
- Gulf architecture 01
- Gulf architecture 02
- Gulf architecture 03
- Gulf architecture 04
- Gulf architecture 05
- Gulf architecture 06
- Gulf architecture 07
- Gulf architecture 08
- Infrastructure development
- The building industry
- Environmental control
- Perception
- The household on its lot
- A new approach – conceptual
- A new approach – principles
- A new approach – details
- Al Salata al jadida
- Public housing
- Expatriate housing study
- Apartment housing
- Pressures for change
- The State’s administration
- Society 01
- Society 02
- Society 03
- Society 04
- Society 05
- Society 06
- History of the peninsula
- Geography
- Planning 01
- Planning 02
- Population
- Traditional boats
- Boat types
- Old Qatar 01
- Old Qatar 02
- Security
- Protection
- Design brief
- Design elements
- Building regulations
- Glossary
- Glossary addendum
- References
- References addendum
- Links to other sites
The beginnings of these studies

This part of the site began with the intent that it would look at the geometry behind the traditional carved plaster naqsh work that is so much a feature of the traditional architecture of the Qatar peninsula. Other notes I made some time ago seem to have taken precedence and much time and effort has been expended in setting those down rather than continuing with the original intent. This page is intended to encourage me towards working again in this area, and starts with a note made some time ago specifically relating to the setting out of naqsh panels in Qatar.
The domestic architecture of the peninsula was simple due both to the lack of disposable income as well as the strict religious beliefs of those coming to live there. Decoration, where it existed, was originally simply scratched into walls and was always geometrical in nature. With time a more intricate form of carved plaster naqsh was developed and that, mainly, should be the focus of this page.
My intention is to begin by looking at the simpler patterns, which really means the older ones which date from the early and middle parts of the last century. The more complex patterns now see in the naqsh patterns used on new and renovated buildings are generally more complex in their designs.
There is more information set out on one of the Gulf architecture pages looking at naqsh work in Qatar. Because of this, be aware tht there may be duplication, or conflict…
The point of this is to suggest that although geometrical patterns formed the basis for all the naqsh work, it appears that there was no great concern to make this work entirely accurate. Most of the examples shown here will illustrate this. My thesis would be that although the simple tools available to them would allow interesting and accurate designs to be set out and fashioned, there was a lack of understanding of simple geometry, little concern, a wish to have the design imperfect, a time constraint or some other reason – or a combination, of course – which impelled artisans to create works with significant departures from an accuracy of layout or execution. This page intends to look at these issues.

But before moving on to the designing of naqsh carved plaster work in Qatar, here, by way of a design and material contrast, is an example of a pre-cast concrete panel used as part of a long frieze on a mid-1960s residential building in Westminster, London. Designed by the English artist William Mitchell, its use of relief to create an abstract design illustrates something of the power of this simple medium. The designs are evidently hand-carved and have not been established on regular orthogonal geometry – other than the setting out of the four vertical panels – this character enlivening the design much as did the older traditional Qatari naqsh carving. Coincidentally, Mitchell worked on a number of commissions in Qatar in the 1970s and 1980s.
Trial and error
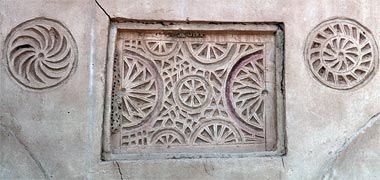
Mention has been made in a number of places about trial and error in the setting out of Islamic patterns. In Qatar, the geometric patterns used to create naqsh panels did not use particularly accurate geometry, and this created many panels with considerable visual energy which would not have been the result had the geometry been set out accurately. An example of this practice is shown here and illustrates a character of execution which modern artisans feel unable to replicate, needing to make their patterns accurate both by training and inclination.
While many divisions are relatively easy to establish, some are impossible to construct accurately and require guesswork or an iterative testing to produce an accurate – or relatively accurate – division. Take, for instance, the difficulty of dividing of a circle into nineteen parts.
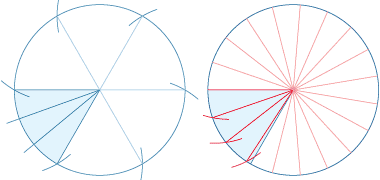
The easiest way to create an unusual number of divisions would be to set out an easy geometry and then make incremental guesses for the number required. If the divisions are constructed on a circle, then stepping around it with a pair of dividers will eventually find an approximation of the required number. Here, for instance, in order to divide a circle into nineteen parts, a circle has first been divided into six by stepping round the circumference of the circle with dividers set at the same diameter as the circle. Within one of the areas coloured blue it is evident that it must be divided into a little more than three parts in order to create nineteen divisions. So, setting dividers at a little less than a third of the distance between the first sub-divisions, a process of iteration with amendments to the setting of the dividers will eventually have produced the necessary dimension for a relatively accurate approximation of the distance required to divide the circle into nineteen parts.
A simple lozenge or slot pattern

Here is a relatively common pattern found in Islamic designs, often in the form of a background. It has similarities with patterns found in Qatari naqsh. Based on a lozenge shape that repeats infinitely in two directions, it is constrained only, as in this case, by a relatively arbitrary selection of frame. It can be seen as a linear pattern or, here coloured, as a slightly more interesting pattern.
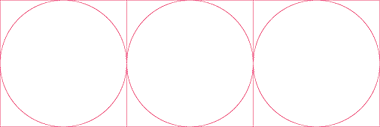
Yet the pattern is based on, or derived from, a square. Here I have shown three adjacent squares at a different scale in order to make the construction a little more apparent. But I have also drawn the contained circle as this form is argued to create the base planar surface for the design of the unit pattern.

In order to construct the lozenges, first take a square, here tinted blue, and draw diagonals from its corners. Through its centre, a horizontal and vertical line are taken to its perimeter, subdividing the square into four smaller squares. These squares are further divided by diagonals. Next, lines are taken from the corners to the central points of each of the sides of the square, creating the square illustrated in the centre. Each of the small squares is then subdivided horizontally and vertically into three by joining and extending lines through the intersections of the diagonals, creating the square at the right of the diagram.
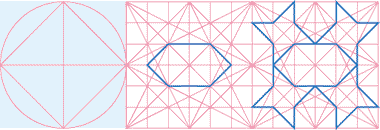
The first part of this illustration shows, rather than the square, the circle on which the lozenge has been established. The second part shows how the lozenge has been created from the diagonal construction lines. Obviously the lozenge might be arranged either horizontally or vertically. In the third part of the illustration I have added four stars that bound the lozenge, though these stars would be parts of the surrounding lozenges in an extension of the pattern.
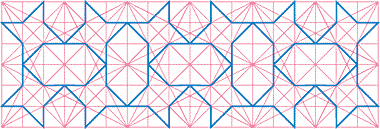

This first diagram illustrates the extended pattern showing how the lozenges fit together, alternating their direction through 90° on an orthogonal grid or matrix. As happens with many geometric patterns formed of two shapes, the eye tends to see one or the other shape, rather than the overall two-dimensional patterning. Here the eye moves between seeing the lozenges and stars.
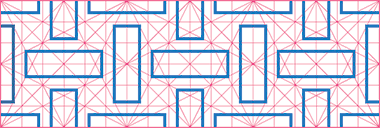
The next two diagrams use the same geometric construction as the lozenges above, but the pattern is orthogonal. I have included the two patterns as they are one of the patterns found in Qatari naqsh work, usually as background or within a complete pattern. The two patterns are essentially the same, the only difference being the points at which the corners of the rectangles are selected.


This lowest sketch, based on the exact geometry of the study above, illustrates something of the character of a naqsh panel with an attempt to give a three-dimensional effect with a drop shadow. A simple effect such as this would have been relatively easy to carry out on either wet or dry naqsh. The pattern is found on the other side of the Gulf where the workers are likely to have originated and is a relatively common pattern in traditional buildings in Qatar.
At first glance these two photographs appear to illustrate an application of the pattern, but will not have required any use of the circle to lay it out. You can see that the pattern has the addition of a small square to create more of an even balance between solid and void, the recessed carvings having the proportion of 5:1. The photograph from which these two details were taken was made in an old majlis at Wakra in the late nineteen-seventies. In the upper photograph you can see a typical naqsh panel with the pattern taking up the whole of the panel as a ground. In the lower photograph you can see how the setting out lines were scratched on the dry or drying plaster in order to define the areas for carving out.

There are two points to note in the above photograph. The first is that the setting out lines are made along the centre of the area to be left untouched, when you might have anticipated that the craftsman would mark out the edges of the pattern, leaving much of the setting out lines hidden. The second is that the carving is relatively deep and has straight sides. On external work it was not necessary to have such deep carving in order for the sun or light to make its effect apparent.
This note began with a suggestion that the argument shapes might or might not be based on circles, was semantic. I have gone through this brief exercise in order to illustrate how a shape is formed by following lines of a pre-constructed pattern. The note on decagonal and quasi-crystalline tiling above showed that artisans used a number of standardised shapes with which to produce geometrical patterns. While only a compass and straight edge are necessary to produce many of the shapes used by designers, it is apparent that they would have used a simplistic system rather than construct all patterns from scratch. My own experience is in seeing artisans using primitive compasses, wooden set squares and chalk. The ancient Egyptians commonly used knotted ropes to form right angles; knots set at three, four and five units apart along a rope would enable a right angle to be readily formed, this being the basis of the simplest Pythagorean right angled triangle.


I have illustrated the construction of a square above, but there are a number of other ways of constructing squares, some of which might be more suited to the production of a lozenge.
Here, to the right, is an alternative way of constructing a square upon a given line. All the necessary construction lines are there but I have added the adjacent squares, circles and diagonals in order to show the relationship with the diagrams above.
The lower illustration has been added as a reminder of the relationship between the lozenge patterns and the square and circle. The illustration clearly shows the importance of the square in establishing the pattern of the lozenges. It is clear that there is a different relationship between the four lozenges in the corners of the squares and the four on the periphery of the circle.
So, the argument about the generator of patterns being square or circle may be semantic, but it is apparent that the circle, or at least compasses, are necessary in order to generate patterns found in Islamic geometric designs. Nevertheless, it would be a rational progression for artisans to use formers constructed to a variety of angles and lengths with which to construct those patterns.
A simple circular pattern

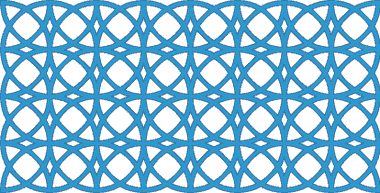
This pattern is also of a relatively common form of naqsh found in Qatar. The construction is simple in that the design is established on the basis of an orthogonal grid of circles set one radius apart, the pattern being four circles wide by two circles high, creating a grid of eight by four rosettes. Because of this duality it has a rather static appearance, one that would be improved were there to be an odd number of circles in the columns and, particularly, the rows. You may notice that the pattern has almost an art nouveauappearance.
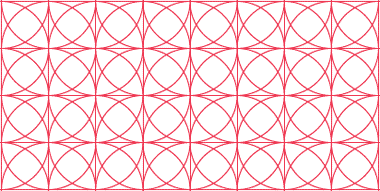
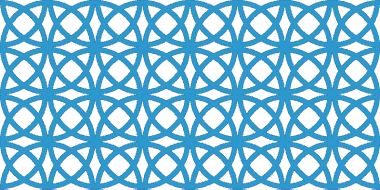
This first diagram illustrates in simple red lines the basic geometry of the pattern above. A grid of equally spaced horizontal and vertical lines is first established, either by using compasses and straight edge or, more likely, a right angled set square and dividers. In fact, when compasses are mentioned with regard to the laying out of naqsh work, it should be understood that the work is usually effected with the aid of a pair of dividers and, nowadays, a pencil. Then, with their radius set to the distance between the lines, a series of circles are drawn out with their centres on each junction of the horizontal and vertical lines.
If there is an unusual character to this simple pattern shown above, it is that the circles are not set out along their centres, but on their outer edges. Generally when patterns are set out, the pattern lines will straddle the setting out lines. This creates a geometric coherence which usually makes the pattern easier to work out and avoid eccentric shapes or difficult junctions. In the case of this pattern, setting out to the edge of the circles establishes a greater distance between the rosettes, which has the effect of producing an overall pattern which is more even in its weight of solids to voids. The first of the two blue sketches illustrates what the pattern might look like when straddling the setting out lines, the lower sketch illustrates the pattern edging the setting out lines.

This last sketch of the pattern shows a more detailed view of the two alternative groups of four rosettes, illustrating in a little more detail, the visual difference between them with a single rosette emphasised to illustrate better the subtle variation. Notice how the rosettes on the right are more clearly defined by having their pattern lines touching the setting out lines, this being the probable reason for the original design decision. When the design is carved out and shadows fall across the pattern, the distinction is enhanced.

This is a variation of the linked circles pattern based on a square. The square is displaced at 45° to a distance of half its side, and circles are drawn from each corner, their diameters the length of the side of the square. Diagonals are drawn through the corners of the squares and, on their intersection with the circles, small squares can be drawn each opposite corner coincident with the circumference of two intersecting circles. Small diagonals are drawn linking pairs of small squares.
Two wall panels
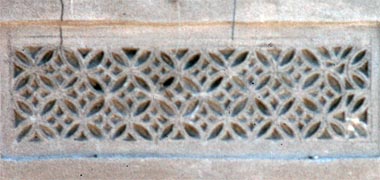
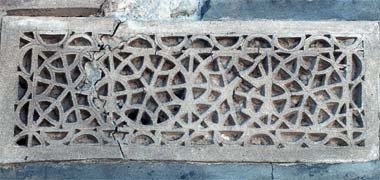
These next two examples of naqsh probably date back to the developments associated with fishing and pearling of the 1930s. They were photographed in Wakra in 1975 and 1982 respectively, a considerable time after the conurbation was abandoned. Both are examples of panels carved, probably, on the ground, and then placed into recesses in the wall. As such they would have represented good practice of the time, a better quality than would have been found in much of the peninsula as Wakra had a significant and coherent quality to its buildings from that time. Yet these panels are simple, a part of their beauty is, like many of them, the inaccuracy of their execution. Notice that both of the panels have been carved deeply, and that neither of the two examples is symmetrical, even though there can be no good reason for this to be so.
Unlike the simple circular pattern looked at above, this pattern has been set out with its lines centred on the setting out lines. The sketches below relate to the manner in which it was design and constructed.

The first sketch illustrates the simple geometry upon which the design was to be constructed. The establishing of horizontal and vertical alignments has not been shown as it is likely that this would not have been used on the original setting out, the work most likely being set out by eye. The pattern has been established on a grid of 7½ by 2 circles.

If the pattern had been executed as might have been anticipated, then it would have looked similar to the illustration shown here. It is evident that it would have appeared to be symmetrical about both its axes and the pattern would have been seen to be correct in its execution. However, for reasons it is difficult to guess at, this was not the case.

This sketch illustrates how the simple geometrical pattern shown above was amended at its right end. Here it is evident that the basic geometry was capable of being amended and a sensible resolution of that end carried out. However, the two circles have been placed in illogical positions suggesting that the panel was determined to be a specific width where it would have been more sensible to reduce its width to facilitate a more rational geometrical arrangement to be made.

Here it is possible to see how poorly the right end of the panel was completed. The lines for the two semi-circles have been established on the right, but the area between them and the rest of the panel have been filled in a haphazard manner, the decisions made in the top right corner being dissimilar from those in the bottom right corner.

The second panel, repeated here, is a slightly more sophisticated design than the first panel in that it has a central pattern contained within a surrounding pattern. If you look at the two panels above you will see that the way in which it has been laid out establishes a considerable movement in its design compared with the first example which is more static in appearance.

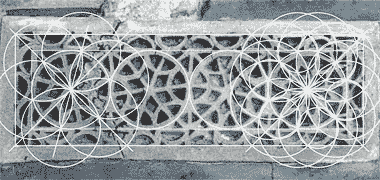
This has been accomplished, perhaps accidentally. The four circles which are the main elements of the central design are contained within a rectangular frame. Lines drawn at 45° from the corners of the frame – shown on the left hand side of this diagram – establish the central point of the outer two circles of the pattern. The six circles of equal radius which are constructed on the perimeter of the outer two pattern circles are set out from the intersection of the 45° line and those circles. This naturally tilts the internal petals created to 15° from the vertical. Each alternate circle is mirrored so that, when the internal lines of the hexagon are added, a waving line is created across the centre of the pattern, as can be seen in the photograph above.
The next elements of the pattern to be set out are the small semi-circles running round the inside of the four pattern circles – the second circle from the left in the diagram above. In order to do this, the pattern circles are divided further from six to twelve and, with centres on every alternative junction along the pattern circle – as seen on the right hand circle above – a run of six small circles are drawn. This introduces a geometric illogicality in that the semi-circles overlap. However, as the execution of this type of work allows a degree of inaccuracy, the result may not show this, as can be seen in the photograph above.

Here is a simplified sketch of the central pattern of the panel. It is illustrated as an accurate drawing in order to show how the pattern might have been envisaged. Even at this scale it is possible to see that the semi-circles are not quite accurate, though the lively character given to the piece by the reflection of the circles about a vertical axis is evident.

While the central pattern and its elements look, more or less, accurately set out, this is more than can be said for the surrounding border. Apparently composed of semicircular shapes alternatively mirrored about an axis parallel with the semi-circles’ base, there are, respectively 11½ and 12½ top and bottom, and 4 and 3½ left and right – although this may not be too accurate a representation due to the inaccuracy of its layout. Whatever the number here, they bear no obvious relationship with the four circles in the centre of the panel. As you can see from the adjoining sketch, not all the semi-circles have been mirrored, and that quarter circles and vertical elements have been added, apparently at random. What is clear is that the artisan who made the panel seems to have run out of inspiration in setting out the surround – or that he made a number of decisions without thinking of their rationale within the overall geometry of the panel. The semi-circles have been marked out with a pair of compasses, but the lines scribed do not meet as might have been anticipated.

The setting out of the semi-circles may seem a little irrational as the system is different from that of the circles in the central pattern. It was probably based on the corners of the centres of the grid lines describing the semi-circles being in line with each other, as shown on the left, whereas the main circles of the pattern have these central lines being coincident, as shown on the right.
The problem with this kind of surrounding pattern is in creating a logical corner, not only one which can turn the corner sensibly but, perhaps, also one which relates to the central pattern. This panel, obviously has not resolved the problem.

Combining the central pattern and its border, here is an illustration of the actual panel, admittedly with a number of small variations, but giving a relatively accurate representation of the original. Note that although there are a number of variations from a simple arrangement of semi-circles, perhaps the oddest decision was to have had two similar semi-circles adjacent to each other on the bottom right of the panel.


These last two sketches can be compared with the sketch above as well as the original photograph of the panel. They illustrate how the pattern might have been carried out had it adhered to a more coherent geometry. The most obvious difference is in the relative proportions of void to solid. This is a reflection of the smaller number of semi-circles in the first illustration – 9 by 3 – and of the larger number of semi-circles in the second illustration – 17 by 5 – which are needed if the semi-circles are to align with the geometry of the circles in the central pattern.
It would be possible to use even numbers of semi-circles, but this would result in the need to have different treatments for two of the corners. Of these two patterns, the lower one is the one which more closely resembles a Qatari naqsh panel.
The design of the spiral

One of the more important features of Qatari carving was the use of the spiral in the design of naqsh panels. This has been dealt with elsewhere and this note is, more or less, a copy of a note on another page. There are two characteristics which appear to attach to the use of the spiral. Firstly, there is the visual motion brought about by use of the spinning motif and, secondly, the sense of direction relating to the use of a spiral spinning in an anti-clockwise manner. Note in this example that the main spiral is set anti-clockwise whereas the supporting two spiral sections have been established clockwise on the left and anti-clockwise on the right – the direction from which the panel would be read.
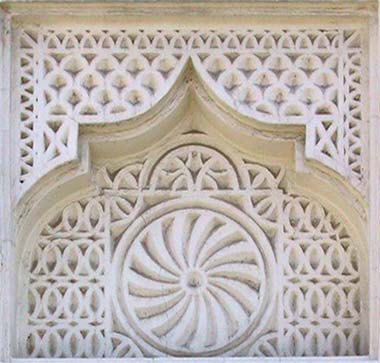
As mentioned above, these examples are looked at elsewhere, but here the intention is to concentrate more on the geometric design of spirals. Looking at the old examples such as that at the head of this section, it is apparent that a great deal of latitude was taken in setting them out accurately. Here, however, is a more modern interpretation, carved in the 1970s and based on fifteen-point geometry. I am not able to say how it was worked out. Five- and six-point geometries are easy to construct, but fifteen and thirty require the use of Neusis to trisect angles, so I have to assume this example was carried out by trial and error or by using a modern protractor to establish the angles of 24° or 12° required to set this central spiral out accurately.
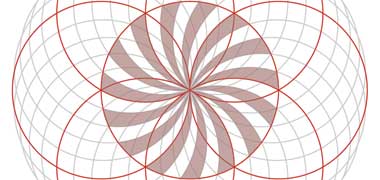
This sketch illustrates how the spiral would have been set out. The central circle is divided into six by the usual method of describing a series of circles of the same diameter as the central circle and with their centres on its perimeter. The distances between these intersections would then have each been divided into five parts either, as suggested, by protractor or by trial and error, the latter a relatively easy method bearing in mind the usual degree of accuracy practised in setting out naqsh panels using a pair of simple dividers.

This suggestion is strengthened by this example of a new naqsh panel, recreated in another building in the 1980s. Here there is a similar spinning motif but, in the case, there are seventeen elements in the design. While it is possible to produce a seventeen-sided geometry, it is extremely unlikely that this would have been the case here. Much more likely is it to have been, again, the result of trial and error setting out.
Mention was made in the first paragraph of this note of the direction in which the spiral has been set. Note that both these motifs spin anti-clockwise. I have written elsewhere about the way in which the way in which we read writing influences the way in which we view other aspects of the visual world. In this case it seems to make sense that the Arab craftsmen would see this as advancing from right to left.


You will see immediately the relationship which the first carved naqsh panel, shown above and to the right, here, has with the lower panel illustrated here, both of them incorporating eighteen blades. This design suggests either that spirals were a common feature of carved panels, or that they were part of the design vocabulary of a single person or group whose work was, or included, carving these panels. Compared with that panel, this is missing the rectangular element at its base but is otherwise the same. Both have the counter-clockwise whirling motif constructed of eighteen blades though the surrounding running pattern is different and, along the bottom edge, further away from the centre of the circle in this example, creating a different fill pattern below the centre circle. Note, incidentally, the small differences in setting out the two panels to the left of the naqsh carving.
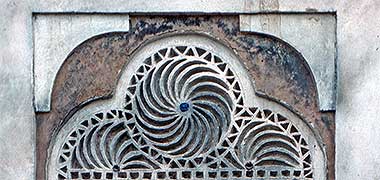
However, this decorative naqsh panel has been divided into seventeen blades, most likely a result of the design being executed quickly and with no real concern for the underlying geometry. This suggestion seems to be supported by the triangular motif which runs around the outside of the spiral and of which there are twenty-two triangles. Note also that the lower left semi-circular spiral moves in the same direction as that on the right, in contrast with the two similar naqsh panels above where this is reversed.

There are eighteen blades on the circles above, which require the positioning of thirty-six points along the circumference in order to set them out. While it is very easy to construct six point geometry and not difficult to construct nine point geometry, it is likely that these whirls would also have been set out on the basis of six-point geometry and then established by trial and error to accord with this degree of accuracy. I should also point out that the centres for the curved blades are set half way between the centre of the circle and its circumference, as illustrated by the blue semi-circle in this sketch.
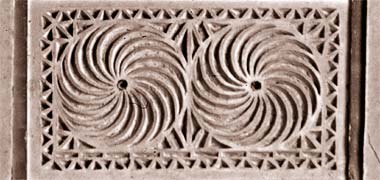
Generally, spiral designs were created as individual patterns, elements in arrangements suited to a range of panel shapes. Occasionally they appeared as single spirals supported by two semi-spirals as shown a little way above. In very rare cases, panels were designed to incorporate a pair of spirals, here seen revolving in the same direction with each spiral made up of eighteen blades, the panel being photographed in one of the many ruined buildings at Wakra in 1972. This type of pattern is ideally suited to a rectangular panel, the internal proportions, obviously, being in the proportion of 2:1, though the addition of the external running pattern will amend this slightly.
Eccentric designs

Many of the pages here make reference to the eccentric setting out of carved naqsh panels or work executed directly into walls. The reasons for this character of work is usually ascribed to a lack of concern, an ignorance of geometric method, the necessity for speedy execution, little experience and a number of other factors. But whatever the reason is, the results tend to have a significant degree of visual energy in them compared with accurate patterns. This is a natural consequence of the eccentricities of setting out, as is illustrated in this apparently simple example which somebody has partly coloured, bringing out an extremely irregular shape from what might be anticipated to be a regular pattern.
The intent of the designer appears to be that the pattern should consist of a number of semi-circles, mutually in contact. On the left, the first semi-circle on the curve touches the first on the lower straight line. On the right, the corresponding pair do not touch. Hence the irregular resultant shape.

One of the problems of setting out associated with this type of pattern relates to the decision on where to establish the surrounding geometry. In this case the semi-circle is the outside line containing the panel. This means that the lines parallel to it and within it, meet at their internal angles at less than right angles. It follows that the semi-circles established on the curve can not be full semi-circles.
On inspection of the scratched setting out marks on the naqsh, it appears that the pattern would have been relatively easy to set out. Why it should lack simple symmetry might be difficult for many to understand without thoughtful analysis. However, the point to make is that although the pattern looks simple, it is not easy to set out. In fact, it is impossible to establish logically for simple geometrical reasons.

Here an attempt has been made to suggest how the circles should have been distributed. The circles superimposed are all of the same size while those on the panel seem all to be different. In particular it is the setting out and sizing of the quadrant of the circle in the bottom right hand corner which has pushed the other circles to the left, resulting in the eccentricity picked out by somebody using a dark blue paint.
Although it is not a mistake as such, it is notable that the circular line on which the top three small circles are centred does not create the same relationship with the edge of the panel as does the horizontal line on which the bottom four circles are centred. The black lines show where the associated circles should be centred in order to create a more logical pattern. However, that would draw the upper left and right circles away from the central circle and nearer to the corner circles.

This illustration shows how the setting out of the small circles would have been impossible. The circles have been expanded so that they touch each other. On the left and right there are two groups of three contiguous circles and, along the bottom of the illustration there are four contiguous circles. The central circle has, by simple geometry, to fit exactly between the upper left and right circles. Moving it up automatically introduces space between it and those two circles. Shrinking the circles will introduce space between all of them, but those spaces will be of different sizes. Discovering this when laying out the circles may be the reason for some of the eccentricity of the pattern.
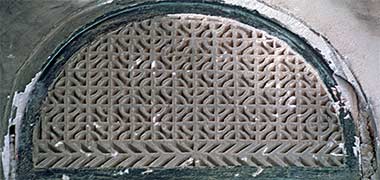
Situated in one of the ground floor rooms of Sheikh Abdullah’s original development at feriq al-Salata was this carved naqsh panel. The photograph was taken in 1972 and has been distorted slightly in an effort to correct its perspective and make it more geometrically accurate, though this is still not perfect. Its interest to me lies in the apparent simplicity of its design. At first glance this appears to be a semi-circle having a square grid laid within it and small circles centred on each alternative crossing of the grid. But this is not so; the panel is truly eccentric.
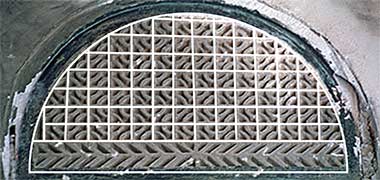
First there is the location of the gridded element of the design which only occupies a part of the semi-circle. In common with many similar designs the main element of the design does not fill the whole of the design; part of the base is taken up with a reflected running design meaning that the main design is not contained within an accurate semi-circle. This creates an issue with the number of squares and their shape. There are fourteen squares spaced horizontally with seven squares vertically. This would suggest that the springing of the semi-circle should be the base line of the grid. But it is not.
As mentioned previously, this is not uncommon in semi-circular designs. But to add to the geometric problems, the grid is not equally spaced along its length – note that there is a small space left on the left edge of the design as well as at the top. While the latter may be arguable due to the flattening of the design in that area, there seems to be no justification for the space on the left.

The other eccentricity is the one which creates a great deal of liveliness in the overall design. The circles which are located at the junction of each alternate crossing of the square grid have been used to create for irregular running lines, one symmetrical group, five individual circles and a number of elements of the circle attached to the outer semi-circle. Here they are, illustrated in different coloured lines. There is no rationale to the design, just what appears to be a naïve or whimsical approach to connecting the circles. Yet the effect catches the eye and lets you appreciate the pattern perhaps more than if it was a rational array of circles.


This pattern was photographed on the top of an entrance porch to a compound in Wakra, and is a feature I have seen a number of times but can’t explain. While it is possible to make a suggestion as to how the simple circular design was established, I have no idea why most of them appear to be canted slightly off a recognisable orthogonal basis and, in this case, why they are not mirrored.
This lower illustration shows a suggested basis for the construction. Looking at it in detail it is evident that the arcs, which would be geometrically continuous in Qatari designs, are not set out in that way here, and it is possible that the layout was done by using plates or dishes as templates, and drawing or scratching round them. But it still is not clear to me why the design is set at an angle, nor if there is a particular significance to this design.
The scratched design has a resonance both in character and the angling of the device with a painted detail on the wall of a courtyard in Doha, also occupied by expatriate workers from the Indian sub-continent.
The development of spiral designs

It is interesting to look at the way in which craftsmen have been able to break down the scale of the work they carry out while maintaining a reasonable degree of innovation within this very limited design area. The example to the right is an example of the new decorative treatments now being carried out over important gateways. Generally they are much larger in overall size than those made in the past. This is not entirely in their favour as treating large areas of wall with small scale geometric patterns results in the confusion of designs. Note the degree of symmetry about the vertical axis on the above example – and also note that the spiral in the centre has thirteen blades.

The photograph above illustrates one of the problems associated with large areas of naqsh carvings. It also shows one of the methods by which the problem can be reduced, that is by the use of planes of carving with substantial distances between them. This introduces improvements in scale and proportion and, where carried out sensibly, can considerably improve the overall work. Here is a small example of this type of solution. Essentially there are four levels employed here; the outside frame within which the work is carried out, the two decorated planes, and a single step between them. All this helps in articulating the work and enlivening the wall and its carvings. The strong sunlight helps in defining the patterns, and this works both when viewing from a distance where the openings can be seen clearly, and also close to the work when the naqsh carving is the focus of interest. Note that, despite this being a new carving, it is not entirely accurately set out, and that the central spinning device is based on fifteen-point geometry.

This example employs the central spinning motif, commonly seen in Qatar, and in this case being based on fifteen-point geometry. It is not possible to state authoritatively how it was worked out, but my suggested construction is shown here. Five and six-point geometries – and, therefore, ten and twelve-point geometries – are easy to construct, but fifteen and thirty require the use of Neusis to trisect angles, so I assume this example was carried out by trial and error.

Compare the fifteen-blade spiral above with the thirteen-blade spiral illustrated at the top of this section. An enlargement of a part of the photograph is shown here. This example, of which there are three on the façade of the entrance, may be thought to have been the result of error in setting out. An illustration of the whole of the entrance gate façade can be found on one of the pages looking at Gulf architecture where it can be seen that, if it were to have been an error in setting out, the error was made three times, suggesting a different reason.

The proposal that these spirals were constructed by trial and error is, perhaps, strengthened by this example of a new naqsh panel, recreated in another building. Here there is a similar spinning motif but, in the case, there are seventeen elements in the design. While it is possible to produce a seventeen-sided geometry, it is extremely unlikely that this would have been the case here. Much more likely is it to have been, again, the result of trial and error setting out. There is one other incidental point to make. Note that both these motifs spin anti-clockwise. I have written elsewhere about the way in which the way in which we read writing influences the way in which we view other aspects of the visual world. In this case it seems to make sense that the Arab craftsmen would see this as advancing from right to left.

You will see immediately the relationship which this carved naqsh panel has with that in the panel on one of the Gulf architecture pages. Compared with that panel, this is missing the rectangular element at its base but is otherwise the same. Both have the counter-clockwise whirling motif constructed of eighteen blades though the surrounding running pattern is different and, along the bottom edge, further away from the centre of the circle in this example, creating a different fill pattern below the centre circle.

There are eighteen blades on the circles, which require the positioning of thirty-six points along the circumference in order to set them out. While it is very easy to construct six point geometry and not difficult to construct nine point geometry, it is likely that these whirls would also have been set out on the basis of six-point geometry and then established by trial and error to accord with this degree of accuracy. I should also point out that the centres for the curved blades are set half way between the centre of the circle and its circumference, as illustrated by the blue semicircle in this sketch.
One of the common features of all these spiral carvings is the hole in their centres. This may be a feature created by the metal point of a pair of dividers used to set out the spirals. Generally their is an annular feature surrounding the central hole into which the recessed carvings can make a sensible junction. Were they to come together in the centre there would be difficulty creating the ridges at their common junction.
Running patterns

Many of the traditional buildings in the peninsula have naqsh panels, as described on this and other pages. Their setting is usually within shaped panels such as those outlined below. But there are a number of other elements to be found in the decoration of walls, the most common of which are the running patterns, one of which is illustrated here, photographed in the early 1970s in the development created by Sheikh Abdullah bin Jassim in feriq al-Salata, the pattern running across the bottom of the double bank of naqsh panels, separating them from the window openings below, out of the photograph.
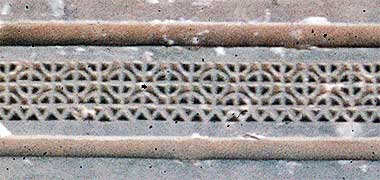
The pattern is around 200mm deep and runs all round the room providing, in visual terms, not only a strong demarcation between the windows below and the decorative panels above, but also a base for the panels. Interestingly a band of chevrons has been added below the main pattern, providing a visual base for the circle and square pattern, though this introduces a setting out problem of its own which has not been satisfactorily resolved. Note that in the photograph of the top of the wall above, a smaller running pattern completes the design above the naqsh panels. That pattern appears to be a standard design detail found in many traditional buildings.
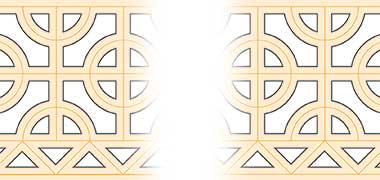
The setting out of this running pattern is interesting due to its being illogically organised. It seems evident that the running chevron design should have connected to the semicircular elements above it – the length of the diagonal being equal to the diameter of the circle and the side of the square – but this has not been effected. In order for it to work correctly there would have to be an equal distance between the vertical lines and the semicircle, and this would have to be equal to the radius of the circle. The chevrons would be right angled triangles.


You can see from the photograph above that an attempt has been made to connect the circles and chevrons where possible, although it would have been relatively simple to set out correctly or logically – whether as illustrated above or in the upper of these two investigative sketches where four chevrons are connected to four vertical lines defining three spaces. Bear in mind that patterns are usually sketched out prior to carving taking place.
Why neither of these should be the case is difficult to deduce. While it may suggest a lack of care, indifference or understanding, there is also the possibility that it a deliberate attempt to assure a lack of perfection in the finished pattern. Perhaps, more logically, the circles and squares were set out first and then the artisan made the chevrons with no previous setting out, connecting where he was able to.
An alternative, and easier, way of setting out the pattern would have been as illustrated in the lower of these two geometric grids, and which is also that shown on the right of the notional example above.

Based on a geometric structure similar to that shown just above, this naqsh panel, photographed on a wall of a Wakra majlis in 1971, has a more sensuous line developed over its underlying geometrical grid. Although the base for its geometry is simple and regular, the pattern appears to be relatively free and has a character different from many of the other naqsh panels in that building.
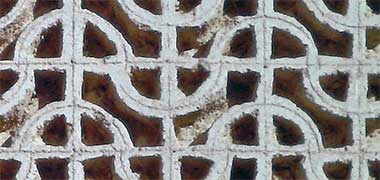
The fact that the design exhibits considerable eccentricity in its execution only adds to its lively form. This detail of a part of the naqsh panel shows how the artisan creating the panel used dividers with different diameters in creating the semi-circles that establish the linear pattern, and had no difficulty in allowing the linear element to be broken at its crossings with the horizontal grid.
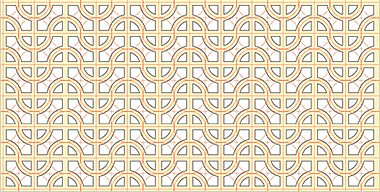
Here is a relatively accurate representation of the naqsh panel above illustrating the geometric basis on which the carved panel was created. Interestingly the panel is based on laying out a grid which has twelve squares horizontally, and six squares vertically. Looking at the original panel in detail it is evident that the horizontal and vertical distances were measured off with a pair of dividers, but that when it came to creating the circles based on the gridded intersections, different diameters of circles were scratched into the surface of the panel, creating a mis-alignment of the semi-circular elements.

This detail of the setting out pattern shows more clearly the simple nesting of the circles that underly the continuous lines. The width of the lineal component appears to be arbitrary and would have been decided by the artisan carving the panel. Given the need to work relatively quickly it is not surprising that there is no geometrical rationale behind the width of the line, despite this decision having a significant effect on the character of the panel.

This effect is crudely illustrated here in an attempt to give an indication of the strength of the pattern’s lines against the dark recesses of the shadowed area of what would be the naqsh panel.
You should also note that there is a considerable ambiguity between the orthogonal horizontal and vertical elements against the sinuous circle-based lines of the pattern, creating another degree of tension in the design.
The next two photographs were taken in one of the buildings in Wakra that had been abandoned many years previously to the photographs being taken in 1972, though one of the patterns was photographed in a room still being used.
The first example is interesting because it uses a type of pattern that is relatively uncommon, but one which has also been seen in large panels of naqsh. The difference is that this running design incorporated lozenge shapes which create a pattern of varying density along the band compared with the type of pattern in the second example which distributes a series of circular elements evenly along the band.

The first running pattern was used both horizontally and vertically as trims within the room in which it was found. As you can see, the pattern has been created on the basis of a simply established square grid. Straight lines have been set horizontally, vertically and at 45° to create the basic grid upon which the pattern has been developed. It is an extremely simple grid to establish and produces an attractive running pattern.


The square grid can be seen here roughly superimposed on the original carved pattern. There is a certain lack of fit due to the manner in which the pattern was carved in situ, but it can be clearly seen how the carving is related to the grid. Below it is a sketch of the theoretical pattern based on that grid.

While the above running pattern has a rectangular basis to it, this is mainly constructed from interlocking circles, a form of geometry which seems to be the preferred method when establishing the underlying grids for the naqsh panels which are a feature of the traditional architecture of the peninsula. While the running pattern is used mainly horizontally, its connection with vertical running patterns tends to be unconsidered, as can be glimpsed on the top right of this photograph where a vertical element meets the horizontal band.


This traditional running pattern has been created by drawing a series of interlocking circles set one radius apart in both horizontal and vertical directions, here shown superimposed in white. Diagonal lines at 45° have been added, superimposed in blue, indicating how the small crosses in the centre of the alternate circles might have been accurately located. As should be anticipated in hand-carved patterns carried out in-situ, there is a slight difference between the accurately laid out geometry lines and the completed pattern.
The lower sketch gives an indication of how the theoretical pattern might have looked had the geometrical construction been more accurately followed.

One point of note is that the three small triangles developed at the bottom of the photograph of the running design are larger than the corresponding triangles at the top, suggesting an arbitrary decision on the relationship between the the outside of the circles and the edge trim. Oddly enough, the creation of the larger triangles at the bottom, compared with those at the top, gives a classical balance to the pattern. Compare this sketch with that above.
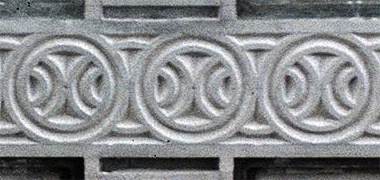


Much of the work on these pages is of decorative naqsh plasterwork carried out prior to the 1950s, and found inside buildings that had been abandoned and were falling apart. Sadly, due to this and random vandalism, it is evident that a large number of examples of naqsh decoration have been lost and, with it, something of the history of the peninsuila.
One of the characteristics of that type of work was the freedom with which the artisans carried out both their setting out and their carving. By contrast, the next three photographs were all taken of the same wall of decorative naqsh plasterwork being carried out within a building being restored in Rayyan in August, 1976. It is notable that both the setting out and carving is more accurate – and that the material is not juss but a weak cement based mix.
The first two photographs are of horizontal bands running round much of the space, the third is of a vertical element which has been rotated 90° for ease of comparison and is one of a number of design elements linking the two horizontal bands and forming frames for panels of naqsh work.
Compared with older examples of naqsh, these bands have been set out relatively accurately within each band, though there was no attempt made to integrate their geometry with the vertical design elements they meet, as can be seen in the first two photographs. Note also that the panels show both pencil and divider marks left by the artisans in creating their designs.

As with the older designs, it appears that the setting out of the circles of the designs relates the described circle to the horizontal edges of the carved elements of the design, allowing the width of the carved circle to emerge from the solid edge band, thus avoiding the fine carving problems there would be if the outer edge of the circle met the edge of the band at a tangent – as illustrated on the right of this sketch. A contributing problem might be that there appears to be no rule governing the width of the bands.

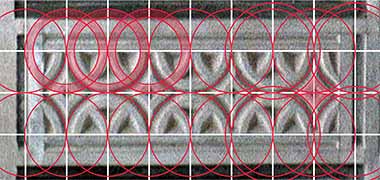
A common problem with setting out the underlying geometry for patterns revolves around the issue of how the centres of circles are related to bounding lines. This is discussed briefly above but it appears, from watching work being carried out on site, that the decisions are made on an ad hocbasis, and that there is no governing rule being passed on between artisans. But this is not the only problem.
These three sketches illustrate how the patterns shown above are likely to have been constructed. The studies follow the setting out lines that can be seen drawn on the faces of the panels, both those in pencil and those scribed with a pair of dividers. The setting out of the patterns has to take account not just of the elements of the pattern which will remain on the face of the panel, but also the manner in which the carving is carried out. This work is cut into the body of the panel at an angle, and this sometimes necessitates decisions being taken which might appear wrong, but which become necessary in order to manufacture the cuts logically. In the case of the lowest of the three panels, the semicircles have ended up some distance apart and have a different character from the other two running patterns. This is presumably caused by the need to define the diamond-shaped elements between the semicircles.
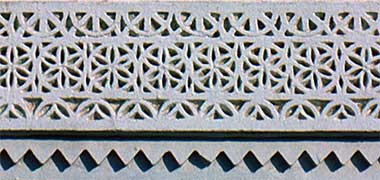
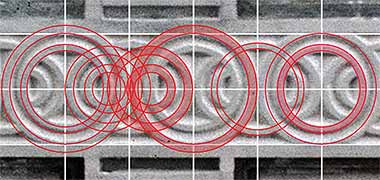
Investigating the geometry of the older, extant examples of traditional naqsh patterns is an interesting activity. What becomes apparent is that there is a considerable lack of accuracy in both the setting out of the underlying geometries as well as considerable latitude in carving of the designs. This example is a more recent example of traditional carving and was carried out in the 1980s. However it still has eccentricities in it which illustrate how the work may have been approached.

At its simplest, it appears that each row of the pattern has been laid out independently of the patterns adjacent to it. In order to illustrate this, circles have been superimposed approximately on the centres of the circles of the central pattern and the semicircles of the two rows above and below it. They have also been used to show how the diagonal pattern may have been established at the bottom of the running design. What is noticeable is that there is no vertical relationship between any of the circles as they are of slightly different sizes. It is difficult to understand why this may be so. While this may indicate a lack of concern, there is also the odd eccentricity such as the slight inaccuracy in the setting out of the second circle from the right of the middle row which is twisted anticlockwise.
Other decorative applications
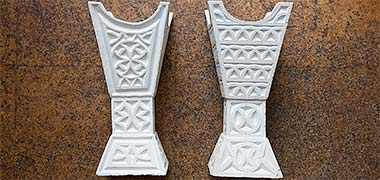
The walls of traditional buildings were not the only location for carved plaster. There is an illustration, on one of the urban design pages, of a midkhan or incense burner. Here is a photograph of it together with another with a slightly different character of design applied to it. This pair date from the 1970s and I have no recollection of seeing earlier examples. It is likely that they were made for decorative purposes within domestic settings, reminders of the past rather than as functioning incense burners. The midkhan needs to be relatively robust in order to take the burning incense and these decorative items are easily chipped. Perhaps even more important, it needs to be relatively light in weight as it is carried round from guest to guest in order for them to be able to waft the incense smoke into their clothes and face.
They appear to have been made from a massed plaster casting and then carved. Here, each midkhan has been divided into its three component parts, base, waist and body, with these elements treated with a separate pattern.
The designs on the left have been created with intersecting circles, this being true for all three panels. The body on the right has been created with rows of overlapping semi-circles and the waist is similarly formed, though from overlapping circles. However, the base is slightly different with the conceptual circle system here broken down and buttressed on each side by arbitrary lines linking from the corners of the panel.
Containing geometry
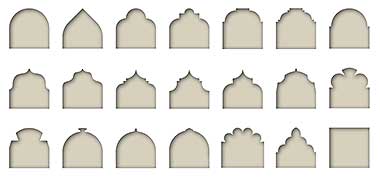
There is more written about these shapes on one of the pages looking at Gulf architecture. Here the purpose is to set out something of the range of geometric shapes which enlivened the trabeated column and beam construction of domestic structures, or which contained decorative or functional elements of the room. The most common elements for which these shapes created a frame were carved naqsh plaster panels and, for the latter, the watad. These panels relieve the orthogonal features of the trabeated construction, softening the lines and creating additional interest. There were few materials available to those building the houses, so the use of juss as a finishing material gave only limited opportunities for inventive design. These decorative frames were one of the motifs which developed, and are to be found both on the outside and insides of traditional structures.
more to be written…
Painted decorative patterns

It was not my original intention to write anything about the painted patterns found in old Qatari buildings. Generally they are few and far between, but a recent look at two old photographs taken of the ceilings in the restored complex established by Sheikh Abdullah bin Jassim at feriq al-Salata suggested a brief note. The ceiling of the ground floor in the central building, painted in the early 1970s and illustrated here, shows its overall design.
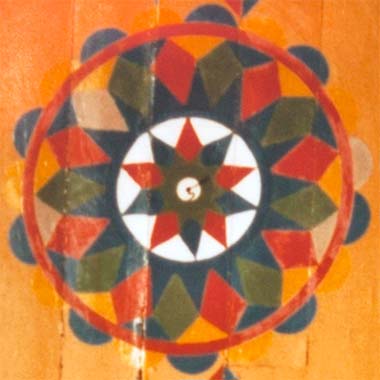
These next three illustrations have been created by enlarging parts of the above photograph of the three central ceiling rosettes and distorting them in order to create, more or less, accurate representations of their geometry. As the focus of the photograph fades with distance, the three illustrations diminish in quality. Despite this it can be seen that there are some significant issues both with the geometry as well as the pattern and colouring.
The rosettes are ordered on the page as seen in the above photograph from left to right and, as can be seen, are each different from the other two. While this is similar in concept to some naqsh work there is often, in plasterwork, the mirroring of patterns across a room. It might have been anticipated that all three rosettes should be the same, or at least the two outer ones.
The five paints used are red, blue, green, gold or ochre, and white, but one of the diamonds in the central rosette appears to have been deliberately painted brown and, in the first rosette there is what appears to be a pale beige used on two triangles, a diamond and a semi-circle. I assume the brown and beige colours were mixed from the other paints, and that the paints were commercial rather than made from natural materials.

There are, essentially, three concentric geometric bands used to create the rosette – the band of semi-circles sitting on the outer, red, circle; the band of diamonds and triangles sitting between the red and blue circles; and the star within the blue ring.
There is no coordinating geometry between the three rings, nor can there be, of course. In the order the illustrations are on the page, the three rosettes deploy their concentric patterns, from the outside, in the ratios of 19:17:10, 19:17:11 and 19:17:10. Neither 17 or 19 are easy divisions to construct nor, for that matter, is 11. Given the naïve detailing of the rosettes, it is unlikely to be significant, but the number 19 has a certain astronomical importance. However, given the overall accuracy of the setting out of the rosettes, it should be assumed that the divisions were made by eye rather than with any use of geometry. Bearing in mind the importance of the building and the quality of the naqsh work, this seems a strange decision to have made.

The next point relates to the irregularity of the patterning. On all three rosettes, the external semi-circles have additions made to them, interrupting the regular alternate colours and supplying the odd, nineteenth semi-circle. The additional semi-circle does not appear in the same location on any of the rosettes nor is it the same colour.
There is a similar irregularity with the colours of the acute angled triangles in the inner ring of shapes, with the exception of the first rosette where all these triangles are blue.
As for the central star, the first rosette alternates five blue and five red points to create a, more or less, regular ten-pointed star; the second star has five blue, five red and a gold point creating an eleven-pointed star; as does the third with four blue, and three each red and gold.
This really is a curious ceiling in terms of the setting out within its rosettes. The character of its eccentricities suggests that the work was carried out by the same artisan and that the work was established by eye and, perhaps, the irregular numbers of triangles and semi-circles was deliberate. If this is so it might relate to the belief that man-made works should not be perfect.
Contrasting with the painted designs on the wooden ceiling illustrated above, the corners of the ceiling are constructed from plaster with naqsh work rosettes but, unusual to this naqsh, it is painted. Again, these two images have been developed from the same photograph as begins this note.


The first of this pair of corner details from the above photograph shows that the basic geometries used for the rosettes are seven, six and four, while for the second all three rosettes are based on eight.
It is significant that the relationship of the geometries to the orthogonal form of the room and ceiling is properly established, as well as it is to each other – this being in contradistinction to the setting out of the painted patterns on the wooden ceiling. While there is a degree of geometric cohesion to the naqsh patterns, their individual painting reflects something of the eccentricity shown on the painted patterns on the wooden ceiling suggesting that it was the same artisan who applied the colour to both the wood and plaster naqsh, but a different one who created the naqsh plaster work.
more to be written…
Search the Islamic design study pages
- Introduction
- Arabic / Islamic design
- Arabic / Islamic geometry 01
- Arabic / Islamic geometry 02
- Arabic / Islamic geometry 03
- Arabic / Islamic geometry 04
- Islamic architecture
- Islamic urban design 01
- Islamic urban design 02
- Islamic urban design 03
- Islamic urban design 04
- Islamic urban design 05
- Arabic / Islamic gardens
- Gulf architecture 01
- Gulf architecture 02
- Gulf architecture 03
- Gulf architecture 04
- Gulf architecture 05
- Gulf architecture 06
- Gulf architecture 07
- Gulf architecture 08
- Infrastructure development
- The building industry
- Environmental control
- Perception
- The household on its lot
- A new approach – conceptual
- A new approach – principles
- A new approach – details
- Al Salata al jadida
- Public housing
- Expatriate housing study
- Apartment housing
- Pressures for change
- The State’s administration
- Society 01
- Society 02
- Society 03
- Society 04
- Society 05
- Society 06
- History of the peninsula
- Geography
- Planning 01
- Planning 02
- Population
- Traditional boats
- Boat types
- Old Qatar 01
- Old Qatar 02
- Security
- Protection
- Design brief
- Design elements
- Building regulations
- Glossary
- Glossary addendum
- References
- References addendum
- Links to other sites