
a collection of notes on areas of personal interest
- Introduction
- Arabic / Islamic design
- Arabic / Islamic geometry 01
- Arabic / Islamic geometry 02
- Arabic / Islamic geometry 03
- Arabic / Islamic geometry 04
- Islamic architecture
- Islamic urban design 01
- Islamic urban design 02
- Islamic urban design 03
- Islamic urban design 04
- Islamic urban design 05
- Arabic / Islamic gardens
- Gulf architecture 01
- Gulf architecture 02
- Gulf architecture 03
- Gulf architecture 04
- Gulf architecture 05
- Gulf architecture 06
- Gulf architecture 07
- Gulf architecture 08
- Infrastructure development
- The building industry
- Environmental control
- Perception
- The household on its lot
- A new approach – conceptual
- A new approach – principles
- A new approach – details
- Al Salata al jadida
- Public housing
- Expatriate housing study
- Apartment housing
- Pressures for change
- The State’s administration
- Society 01
- Society 02
- Society 03
- Society 04
- Society 05
- Society 06
- History of the peninsula
- Geography
- Planning 01
- Planning 02
- Population
- Traditional boats
- Boat types
- Old Qatar 01
- Old Qatar 02
- Security
- Protection
- Design brief
- Design elements
- Building regulations
- Glossary
- Glossary addendum
- References
- References addendum
- Links to other sites
Other studies

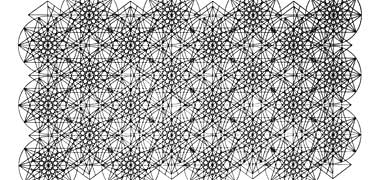
This geometric study, one of a number I made some time ago, shows the construction of the Egyptian door panel illustrated in the outline perspective further up the page. Based on ten point geometry it has the aesthetic advantage of being related to the Golden Section and is one of many ways that the geometry can be used to form different patterns on which are based constructions from a variety of materials.

Ten point geometry lends itself to a wide variety of design possibilities through relatively small variations in the underlying relationships. Many of the more interesting examples can be seen as panels on woodwork in Syria and Egypt, this being a study of an Egyptian panel. It is useful to see how little of the overall geometry is used for this running pattern.
And this study, based on a panel of ceramic tilework, was undertaken as an examination of its underlying geometry, particularly from the point of view of determining the relationships between the circles containing the ten points. Note how the underlying geometry is based on the central ten-point rose being turned through 18° compared with the study above.
I should add that the above original three studies were made using traditional drawing instruments on A4 paper and are all I have left of a number of studies, the others now being in private collections. The majority of sketches on these pages were made using computer software.


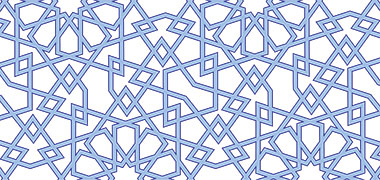
The preceding black and white illustration shows the developed geometry for the study. Initially constructed as a drafting exercise with compass and straight edge, it looks considerably more clear in the drafted artwork than it does here reduced in size for the purpose of this essay. However, these three blue and white illustrations are based on it and should enable me to make a point.
The top illustration is of a ribbon pattern based on that extended geometry, and appears very much as a lace pattern. The middle drawing is a detail of that ribbon, giving a more clear idea of the way it works, and with a horizontal feel to it. The lowest of the three is the same pattern but rotated through 54° and has a very different feel to it, which is something a lay viewer might not expect. These studies, of which I have made many, illustrate a small number of the numerous possibilities there are for setting out patterns and, even without the addition of detailing and colour, the enormous opportunities for variation – with the possibility of three-dimensional or sculptural effects to create even more variations based on a simple ten-point geometry.
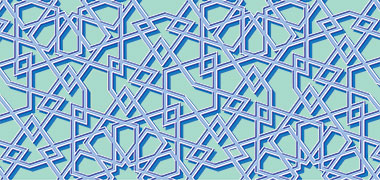
Here’s a brief exercise to demonstrate how basic two-dimensional patterns can be given a degree of form and depth. It’s exactly the same diagram as that above it. All I have done is give a hint of highlight top left and a heavier shadow, bottom right to give it a three-dimensional effect. The difference between this and its original drawing is dramatic and shows how easily these patterns can be developed.


And, here’s the real thing. These first two photographs illustrate the kind of detailing we commonly associate with Islamic geometry. They are taken from a sixteenth century Mamluk Egyptian minbar and are both based on ten point geometry. This underlying geometry can be constructed in many different ways and will produce variations that are implicitly understood as being related. The ways of altering the relationship between the elements of the geometry appears to be relatively simple, but every decision results in complex patterns that can appear quite different from each other. The actual detailing, here carried out in wood with painted elements, is capable of infinite variation though, having said that, local styles tended to work with a limited design palate and have a similar look about them. In reality designers tend to restrict their studies to a tried and tested series of designs which, nevertheless, are capable of an apparently infinite number of designs.

Just to illustrate how ubiquitous ten point geometry seems to be, here is an example of an Egyptian fourteenth century leather book binding. It is possible to see that it uses a different arrangement from the examples above, and how readily ten-point geometry lends itself to the creation of different patterns. This is a beautiful example of the book-binder’s art.


These next two photographs are of an old inlaid box made either in the Lebanon or Syria, probably between fifty and a hundred years ago. This form of inlaid work is very typical of a wide range of goods that are now produced for the tourist market but are based on traditional finishes on furniture, quran stands, boxes and the like. The techniques of manufacture have not changed in centuries though the materials may have. Now, for instance, instead of ivory, bone is used or even plastic for white elements such as on this box. The top photograph is based on six point geometry, the lower on eight point geometry though there is some twelve point geometry used in the side details. Again it can be seen how the geometries meld together and work at different scales as a unified design.

Compared with the eight and twelve point geometries of the two photographs above, here is a six point geometry based design which looks remarkably similar at first glance. Set out on a tambourine it is an easy geometry to work with, but is not favoured in some parts of the Arab world. What seems to me to be significant is that the pieces are more accurately constructed, but I don’t know if this is a result of the degree of craftsmanship or the ease of working with this particular geometry.
The usual method of constructing the inlay is for rods of the different shaped materials to be brought together in the required pattern to form a bundle, and the bundles then to be sliced thinly to create groups of patterns.

These next two examples may be usefully compared with those above in that they are more recent examples of inlay work. They are details taken from a backgammon board that was made around 1980. I don’t know where the board was manufactured, but most probably it was the Lebanon. The workmanship can be seen to be more accurate than that above which might be ascribed either to its intended quality or a slightly different method of manufacture – as described above, the rods making up the bundles of pattern being more accurately shaped.
To give an indication of their size, the first photograph is of an inlaid panel, the original around 170mm square, with the diamond of the second photograph being about 110mm across.

The first panel is set out on a four-point geometric framework with a central square supported by four smaller squares in the corners. There are very slight variations in each of the four small squares, as is often the case. The four supporting rectangles each contain a pair of hexagons with their internal arrangements obviously established on a six-point geometry.
The setting out for the basic geometry is interesting as the decision-making process involves relatively simple selections. This animated illustration gives a suggested basic relationship of the setting out decisions. Not all of the construction lines have been shown in order to keep the diagram comprehensible, and it has to be borne in mind that the patterns rely to a large extent on the width and placement of the surrounding ribbon elements.

This element of the inlay patterning is evidently made with six-point geometry to guide it. The central diamond shape is composed of two equilateral triangles with internal angles for the rhombus of 120° and 60°, its sides supported by obtuse triangles with internal angles of 30° and 120°. The outer sides of these obtuse triangles are supported by equilateral triangles within internal angles of 60°.

As with so many of these decorative inlaid boards the six-point geometry underlying the pattern is relatively simple and will have required little skill in setting out, requiring only a straight edge and compass. However, the bundles containing the smaller elements of the pattern have been very accurately assembled, giving a crispness to the overall design. Here I have only suggested some of the guidelines to indicate the setting out.

By way of contrasting materials, here is, firstly, part of a pavement inside one of the most beautiful of English abbeys, Fountains in the north of England. Construction began in 1132 AD with much of the construction being effected by lay brothers who, by carrying out the more practical work, relieved the Cistercian brothers of the more physical work on the development. The pavement is based on four point geometry and is constructed entirely of only three different tiles: a square, a lozenge and a triangle. I don’t know where the craftsmen came from who carried out this work, but the point of placing this illustration here is that geometries are universal.

Approximately two hundred years later the craftsmen working on the Alhambra in Granada, Spain, produced work which was a great deal more complex. This photo is a detail of one of the pavements at the Alhambra and you will be able to see that, while the geometrical basis of the Fountains Abbey pavement is four-point, this is eight-point, here shown turned through 22½° compared with the example above. The complexity is introduced on a relatively simple basis by the use of colour and the doubling of the structure lines while employing the technique of cutting the tiles in such a way as to imply the interweaving of the running lines.

Having a strong resonance with the two-dimensional weaving floor pattern illustrated above, here is a section of pattern from the centre of a woven basket which illustrates an actual three-dimensional working of a pattern, albeit on a base of a six-pointed design rather than the eight-pointed above. This type of work appears in many parts of the world; it is not confined to the Arab or Islamic world as it would have been an easily workable method of creating panels from simple materials readily to hand, and with a degree of artistic inspiration. This particular example is Japanese and it is evident, in the centre of each hexagon, that a complete interweaving was not possible.
Cosmatesque design

These first four photographs may appear to have little in common with the subject of Arabic or Islamic geometry, but I am including a note on this type of design here for a number of reasons. First, the expression of religious art through geometry is intrinsically important as well as interesting to me; secondly, there are only two examples of this type of work in England, at locations to which there is relatively easy access, London and Canterbury; thirdly, these are said to be the only examples of this type of work north of Italy and, fourthly – and of particular relevance to the subject of this page – there is an unusual geometrical detail to be found in the design of the Cosmatesque pavement of Westminster Abbey, a roundel established with eleven-point geometry.


The first two photographs illustrate Cosmatesque design work in the floors or pavements of two religious buildings. Both are located in Rome; the image above is located in the church of San Benedetto in Piscinula, and that below it, to the side, is part of the central guilloche in the church of Santa Maria in Trastavere. These two photographs, while both of Roman examples, illustrate the typical character of Cosmatesque design in order that you may be able to see something of the difference between Cosmatesque and Islamic design work.
Although the first two of these four photographs are of pavements, you should be aware that Cosmatesque work is also to be found on vertical surfaces and columns.
It may have no relevance to the geometry discussed on this page, but I have included these two photographs of Cosmatesque work applied to barleysugar columns. The first was photographed in the Roman church of Santa Maria Trastavere, and the lower, on the tomb of St. Edward the Confessor within Westminster Abbey, London. It can be seen that the Roman example is likely to have been restored, while that in Westminster Abbey has not, at least, not recently. It is also noticeable that the running patterns in Westminster are more simple, perhaps suggesting that they are earlier work. They should both be seen in relationship to the first two photos above, both showing the typical running pattern which characterises Cosmatesque design.


As mentioned above, there are only two locations in England where Cosmatesque designs have been installed, both of them in the south of the country. These are to be found on the pavement before the high altar and around and on the tomb of St. Edward the Confessor in Westminster Abbey, London; and the pavement known as Opus Alexandrinum beside the tomb of St. Thomas à Becket in Canterbury Cathedral, Kent, both illustrated here.
There are no other designs like these in northern continental Europe, the style mainly being found in Italy where it originated and was developed through the work of the Cosmati family, members of which were involved in decorative work as architects, sculptors and mosaic craftsmen during the thirteenth century.


These next two images were photographed in 2002, before the restoration work was carried out on the pavement. They illustrate something of the state of the pavement at that time, and the need to clean and restore the pavement which was suffering from damage caused, in the main, by uneven wear resulting from the different densities and the pedestrian traffic wearing characteristics of the various coloured stones which made up the mosaic patterns.
The work is characteristic of that produced by the Italian Cosmati family, who developed their style in a development of, though derived from, the predominating Byzantine work of the period. The distinctive character of this work can be seen in these four corner details and those above though, in these details, the overall and linking patterns are not shown, just the single roundel. Since the original photographs on this page – which were taken in 2002 and shown to the side, here – the pavement has been restored to something of its former glory.


These four images, like those above, illustrate a different type of geometric approach to the design of paving, this time in Britain. Laid in 1269 under the supervision of the master craftsman, Petrus Oderisius, or Odoricus, these four roundels are a small sample of the Cosmatesque pavement in front of the High Altar in Westminster Abbey, London, and are those located at the four corners of the pavement.
In the first illustration, the large hexagon contains eight bands of six-pointed stars, the star bands alternating in colour. Oddly, the rows are not quite established in a regular geometric manner to the geometry of the containing hexagon as might be anticipated. The surrounding band is set out with fifty-seven elements.
In the second illustration, the large hexagon contains seven mutually touching six-pointed stars and is immediately surrounded by a band of thirty six-pointed stars.
In the third illustration, the large hexagon is surrounded by a band comprised of thirty-six small squares interlocking and set on the diagonal. Opposite sides of the hexagon are linked by eight six-pointed stars each contained and set within a rhombus, creating a simple lattice arrangement and, contrasting with the first roundel, the pattern is centred more or less accurately, and there are thirty-six squares in the surrounding band.
In the fourth illustration, the large hexagon contains six-pointed stars and hexagons which again are not quite accurately set out. Around the central hexagon are three bands of triangles, all three containing fifty-nine triangles.
It should be noted that the heavily worn state of the Cosmatesque work in Westminster Abbey was due to a combination of the depredation of pilgrims, lack of proper maintenance and poor restoration compared with the Italian examples above it, there being the practice in Italy of keeping their pavements in good repair, but at the expense of destroying the original work.
There have been four restorations of the pavement since it was laid in Westminster Abbey. Early in the 1660s the restitution of the monarchy saw the first restoration of the pavement; the second was in the early eighteenth century; the latter years of the 1860s saw the third, and the latest was completed and re-dedicated in 2010. Elsewhere I have touched on the fashions which have affected restoration work, not just in architectural areas but also in painting and archaeological work. Those with an interest in this subject should look elsewhere though it might be useful to make the general point that, in replacing work in a similar manner to the original, the history of a piece may be lost. It is around this conceptual difficulty that many issues relating to conservation and their resolution turn. But this is not the place for those discussions.

Mention should also be made here of the significant element of mystery surrounding the conception, design and incorporation into the fabric of Westminster Abbey. A number of scholastic papers have been written on these areas and, for those with an interest in the political and symbolic background of the pavement, the papers by Foster and Sharp as well as the research papers edited by Grant and Mortimer might be pursued. There is also an illustrated book by Pajarez-Ayuela which mentions the work not just at Westminster, but also at Canterbury Cathedral. My notes here are intended to relate only to the geometry of a small part of the pavement, a single roundel on the western edge of the pavement, identified in blue on the sketch a little way below.

The chief design characteristic of Cosmatesque work is to be seen in its vigorous style, created through the palette of its containing shapes and the colours used. While constructed with the basic geometries, the curvilinear elements of design tend to be set on a plain ground which, in Italy were pale marbles and, in England, Purbeck marble – actually a hard limestone. The designs were established as simple geometric shapes which were surrounded and trimmed by bands and ribbons of mosaic created with semi-precious stones and glass in the English versions. These pavements must have been extraordinary in their first viewings, particularly in England where the tradition for pavements was mainly stone flags or fired tiles and where the Westminster and Canterbury works were a notable and considerable departure.
Cosmatesque work also has the characteristic, and one that further distinguishes it from Arabic geometrical patterns, in having considerable symbolic content. According to Foster, who based his opinion on both an analysis of the inscriptions on the pavement as well as a study of the symbolism of the overall geometry regulating the composition, the pavement represents a schematic description, or symbolic compendium of the whole of the universe.

Conceptually this is very different from Arabic geometric work, containing within it messages or associations claimed to relate to Christianity, liturgy, cosmology, choreography and other aspects that may be complex if not obscure. Because of this, for instance, a full interpretation of the Westminster pavement is still awaited, though here are two descriptions believed to be contained, firstly, within the overall pavement design to the left and, secondly to the right, within the central quincunx, both according to Foster. Those interested in these aspects of geometry will again have to look elsewhere as these areas are complex and have little or nothing to do with the main subject of this site.
Islamic and Arabic geometry, on which Islamic patterns are based, may also have symbolism embodied within some works, but these relate in the main to numerology. In calligraphic geometrical work there is, of course, a specific meaning to the work contained within the calligraphy itself. But typical geometrical work, as well as that containing naturalistic elements does not have this. There are more notes written on this subject within the Islamic architecture pages.

The quincunx is usually formed of a central circle and four surrounding circles, though may have a square or rectangle in its centre. While simple geometry is used to establish the layout, you can see how different it appears from Islamic patterns in its loose form and, of course, the overlapping curved line. Islamic patterning, by contrast, tends to be far more intricate, particularly in designs constructed of mosaic.

This sketch illustrates the basic geometrical setting out of a quincunx, and while not accurate in its dimensional relationships, it reflects the organisation of the centre of the pavement before the high altar in Westminster Abbey.
The first point to note is the use of the flowing, curvilinear geometrical line within which medallions of pattern are located and whose geometry can be seen to show influence of the Roman work from which it has descended – albeit with the Greek and Byzantine influences that moved into Rome round about the eighth century. It may be fanciful but note that the overlap of the running design reflects how a person might draw it moving from left to right – compared with Arab or Islamic work described elsewhere.
This grouping of a central circle surrounded by four smaller circles is known as a quincunx. In the illustration below it is known as a poised quincunx as one of the diagonals is set perpendicular to the principal axis of the ornamental composition which, in this case, coincides with the axis of the Abbey. In technical terms, the Westminster example is a decussate-quincunx-in-quincunx. The word ‘decussate’ means ‘ten’, this referring to the Latin form of ‘ten’ in the form of an ‘X’.

This third sketch illustrates the geometric basis governing the whole of the pattern of the pavement, including its basic containing framework and the central pattern illustrated above. You can see it is based on √2 geometry. Commonly artisans constructed this geometry with the inner, poised, square having a side compared with the containing square in the ratio of 1 to √2. There is a geometric way of establishing this proportion – a right angle triangle with adjacent sides equal, will have a hypoteneuse of √2 to the adjacent sides. But artisans usually constructed it by measurement, utilising measures in the ratio of 12:17. This has been established at Westminster because the measurement of the respective sides of the squares is 3·57 metres and 5·05 metres, it being claimed that these are exactly 12 and 17 Roman feet, a Roman foot being just less than a British foot at that time, around 11·5 inches or 296 mm, which strongly suggests that the craftsmen were Roman, or were working to Roman direction. However, the detailed restoration work that was carried out on the pavement in 2008 may cause the claim for Roman authorship to be revised.
According to Pajarez-Ayuela, it should also be noted that, where ‘C’ is the diameter of the central roundel of the quincunx, and where ‘A’ is the width of the square circumscribed around the quincunx, in any Cosmatesque pavement the ratio of ‘C’ to ‘A’ is always within the following limits: ⅓ ≤ C/A ≤ ½

Bearing in mind the number of inaccuracies inherent in working on a small photograph of the pavement, and the fact that the layout of the pavement was likely to have been measured rather than geometrically established, this fourth sketch is a more accurate representation of the underlying geometry of the Cosmati pavement at Westminster Abbey. Nevertheless, it is evident that some establishing geometry is evident in the layout.
In particular, the large circle determines the size of the square, together with its copy rotated through 45°. At the four points of intersection of the diagonals and circle, four smaller circles are drawn, each half the diameter of the large circle.
These four circles and their intersection with the two diagonals locate the centres for the next four small circles. The first four circles also appear to locate the extent of the twenty circles – five in every corner and, by extension, the four rectangular panels, one at the centre of each side of the square.

While this illustration is a very small copy of a much larger investigative construction – which is true for all these drawings – there appears to be no geometric relationship between the smaller circles and the larger ones if they are drawn as accurately as possible and then nested for comparison, as shown on the right. The assumption has to be that there is not the geometric consonance which is found in Arabic and Islamic patterns.
Notice in the detailed third sketch above, that the geometries which establish the patterns are discrete, they do not link with each other but sit adjacent to or within other geometric frameworks. This allows for elements of banding between the geometries which is a characteristic of Cosmatesque work but which tends to differentiate it from many Islamic frameworks where continuous geometries are more likely to be the norm and where there is significant repetition.
As mentioned earlier, the Westminster Abbey Cosmatesque pavement has two features which are of particular interest, the first being the wide variety of patterns used as infill within the overall framework. There is a considerable body of literature dealing with this, some of which is referenced above. Much of this literature investigates the historical and political setting which saw the introduction of the pavement to England as well as its symbolism. This latter issue really falls outside the intended nature of this page though it is worth noting that there are a number of other factors relating to cosmological and other causes which may govern both geometry and pattern in design. But this part of the pavement stands in significant contrast to the manner in which Arabic designs are put together. I can not recall seeing an Arabic design where different ground patterns are associated within a single geometric design.

All the roundels on the pavement are different in character and design, but there is a particular feature of the pavement that I find very interesting – and is the real reason notes on the pavement occurs on these pages at all – and that is the fact that one of the features of the pavement, one of the small roundels, has its geometry based on eleven-point geometry. The roundel is the closest seen to the left or north of the surrounding roundels when standing outside the pavement facing the altar to the east, and is identified in blue in the sketch layout immediately above.
There is more written about the construction of eleven-point geometry on another page of these notes.

The hendecagon, or eleven-sided figure, has internal angles of 147·2727°… – a construction that can be seen illustrated here. Bearing in mind that it is not possible to construct one using compasses and a straight edge, it makes this geometry a strange choice to select for the basis of a decorative pattern. My understanding is that this particular feature was associated with the 1860s restorations, and it may be that it was altered and this geometry introduced at that point in time. If that is the case it is certainly unclear why this particular geometry might have been selected. This illustration of a hendecagon shows it divided, on the left, into twenty-two parts by lines running through its centre and, on the right, with all its chords drawn, illustrating something of its potential for complexity.

Illustrated to the near right, the roundel is comprised of six concentric circles of unequal widths containing triangles and a small number of lozenges. While all the internal divisions of this particular roundel have eleven sub-divisions, the outer circle is divided into thirty-nine parts, again a very unusual choice if simple geometry is required to construct it. To demonstrate the lack of geometrical congruity between the eleven and thirty-nine sub-divisions, to the right there is an illustration showing eleven sub-divisions with thirty-nine sub-divisions superimposed on them.
It seems that the only way in which the pattern is likely to have been constructed is by a process of trial and error. Looking at the whole of the work of the pavement it is noticeable that there are very different standards of expertise in the cutting and laying of the elements of the design which suggests that the different areas of the pavement were finished to significantly different standards – a rationale which seems extremely unlikely – or that the work was not carried out coevally. Those which are laid in this particular medallion are relatively coarsely cut and placed which suggests this work was carried out by a different artisan and, perhaps, that the stones making it up are those taken from a previous or different pattern. The inaccuracies of cutting may also have been responsible for some of the inaccuracy of laying out. I found it difficult to measure so have produced a sketch whose dimensions have been generalised. It is not a working drawing.
It should also be noted that the machinery used to cut and work hard materials will have developed over time, the more modern work utilising far better cutting equipment than would have been available to the original craftsmen. Despite this, it has been pointed out to me that some of the work which is believed to be original is of a very fine standard and, in this respect, stands in contrast to what is likely to be some of the later work.

Here you can see a rough sketch of the pattern, not drawn to scale, but approximately accurate. I have shown all elements the same colour. In reality they are beige, rose, red, black and green, some idea of which can be seen a little higher up the page. Beside it is a diagram showing the circular divisions of the roundel with, lighter, the line of the smaller triangular elements of the design. I have kept the size of these diagrams small on purpose in order to mask the difficulties of aligning the different elements, but it is evident even here that there is a difficulty in establishing a satisfactory relationship between the outer ring of thirty-nine divisions and its neighbour of twenty-two, never mind the problems of setting out eleven, twenty-two and thirty-nine divisions.
This outer ring bears an approximate relationship with the next inner ring of twenty-two – 22:39 – or √3. Considering the numerology and symbolism which others have argued to have gone into this pavement, it might be anticipated that there is a mathematical relationship between the rings. But 22:38 would be a more significant relationship and 22:35 or 22:36 closer to the Golden Section. The relationship of the outer ring to the inner rings of eleven sub-divisions would approximate pi if the outer ring had thirty-four or thirty-five sub-divisions – 11:34 or 11:35, and not thirty-nine.
So, here we have a pattern, difficult to set out, which appears to be based on slight but poor mathematical or geometrical relationships, and which suggests that the relationship is accidental, or that the numbers are significant and relate to something symbolic, the geometry of construction being incidental to the meaning. Nevertheless, I believe the roundel is fascinating whatever its original geometric intent. Perhaps it might be best to see it in a similar light to the eccentricities which exist in nature, but remember, this would never happen in an Arabic design.

There is an earlier comment in these notes on Cosmatesque design which looks at the quincunx, a feature of this character of pattern work. Examples of its use are found in Westminster Abbey not only on the pavement in front of the High Altar, but also on the shrine of St. Edward the Confessor. Sadly that work has been degraded over time and, at the time of writing this note, in 2024, there are no plans to restore it, perhaps because it would be a major intervention in the fabric of the tomb. There is more detailed information on the history of the shrine on the Westminster Abbey web site. It seems that some of the stones which made up the infilling of the pattern were removed some time ago for safekeeping, and not replaced when the shrine was reinstalled, though the pattern had plaster applied and painted decoration added.
The shrine is located immedately to the east of the High Altar, separated from it by a stone screen. These two photographs show, respectively, the west facing side of the shrine and its south-east corner.

Although St. Edward died in 1066, the work on his shrine was only completed in the thirteenth century, with the Cosmati work on the shrine of St. Edward being finished in 1269. The tomb was taken apart and partially destroyed in 1540 but, under the rule of Mary I, it was reassembled in 1557. St. Edward’s shrine is considered to be the centre of Westminster Abbey.
The purpose of these two photographs is to show something of the manner in which the Cosmatesque pattern has been used on the shrine, and the similarity of its patterns to the work at a larger scale on the pavement to its west. The design is said to have been inspired by the work at Canterbury Cathedral and to have been completed prior to 1220, though might have been a little later.
The first photograph above shows how a version of the quincunx has been developed with six design elements arranged in a pattern three wide and two deep set within a simple frame.

However, it is not quite the same design as that on the pavement in that each of the units is described with a double line compared with the pavement which is essentially a single line design as illustrated above, there is no central circle in each group – which would have made them quincunxes – and they are not each established as a square but as a rhombus. Why this is so is unclear as it might be anticipated that the pattern would relate more directly to the regular layout of the pavement. A very crude measurement, made from a photograph, suggests that the internal angles of the rhombus are 96° and 84°. Note that this first drawing illustrates the pattern, but is drawn with squares rather than with rhombuses for ease of illustration. Again, a crude measurement of the proportions of the outer squares to the diameter of the larger circles suggests a proportion of approximately 1:2.

One of the eccentricities of this pattern and, again, a difference from the way in which Islamic patterns are constructed, is that the pairs of circles sitting vertically appear to just touch, while the pairs related horizontally elide with each other; nor do the containing rhombuses relate geometrically, making an accurately drawn reconstruction difficult. In these studies, the containing rhombuses are drawn as squares, and have been constructed to meet geometrically accurately and not as is the work on the shrine – in slightly different relationships to each other.


From a purely geometrical point of view, if the four circles meet accurately, horizontally and vertically, then the sides of the rhombus can not be equal. Conversely, if the sides of the rhombus are of equal length, then either the circles are not the same size or their points of connection are different – which might account for their meeting as described above.
This pair of studies illustrate the notional construction of the basic pattern. A particular characteristic of the panel, shown a little way above, is that the six elements are more or less accurately contained within the overall frame. This contrasts with the rectangular patterns in the pavement where the two on the east and west edges do not. This latter eccentricity is very different from the way in which Islamic patterns are constructed; and it is difficult to understand how the Christian craftsmen seem to have had no apparent concern for diminishing the design integrity of the patterns in this way.
While the basic pattern on the shrine appears to be groups of four circles separated by squares set at 45° – or more accurately as described above, as rhombuses – in fact the overall pattern has not been developed with circles contained within a square, but with circles following around the outside of squares as is shown in the illustration above. It is not now possible to see what, or if, there were patterns within the centres of the squares, but it must be anticipated that there would have been a mosaic pattern within each square given the importance of this face of the shrine.


Having looked for information relating to the design of the east face of the shrine, there seems to be little to be found even though there is an interesting design feature at the top of the shrine. This is a development of the patterns on both the pavement and the west end of the shrine where, rather than having four circles connected by a square set at 45°, there are four small circles connected by a larger circle in a fluid arrangement. In this small pattern there are two of these designed elements, both rotating in the same direction, and not mirrored as might have been anticipated.
However, looking at the photograph to the side, it can be seen that there is again an issue from a design point of view with the two elements of the constructed design being cut on their junction with the surrounding frame.
The construction of the two designed elements is relatively easy resulting in an elegant relationship between the larger and smaller circles. While this illustration is not an accurate representation of the original work, there is obviously the possibility of variations in the finished effect using different thicknesses of the lines shown here in red as well as the space between them.
Finally, this graphic is intended to illustrate the pattern as it exists in the form of a contained rhombus. The construction has been made with the internal angles at 96° and 84° and may not be exactly in accordance with the Cosmati constructed pattern. However, it does illustrate – in blue – how two areas of the pattern are now dissimilar in size, though they would be equal were the containing geometry to be a square – as is shown in the illustrations a little way above.
This next note, on the geometry underlying a pavement at Canterbury, is related very closely to the example of the Cosmati pavement in front of the High Altar at Westminster Abbey; both of them of interest for the geometry, though in the case of Westminster it was a particular roundel that first drew my attention. In this case, and at first glance compared with the geometry of the pavement at Westminster, the pavement in front of the Shrine to St. Thomas Becket, Archbishop of Canterbury appears to be a more discrete geometrical arrangement.
Notes on the geometry of the pavement at Westminster are shown immediately above, and further up the note, but first a little history of the work at Canterbury.


Considered to have been laid prior to the development of the pavements at Westminster Abbey, a Cosmati pavement was established in Canterbury Cathedral in front of the Shrine to St. Thomas Becket, Archbishop of Canterbury.
Prior to the new pavement being laid in the Trinity Chapel of Canterbury Cathedral, there existed a pavement of forty-eight roundels, as illustrated in the first of the two illustrations here, and laid around 1220. Four rows of twelve roundels were arranged approximately north-south, the roundels in each row being equally distanced from each other, but the spaces between the three rows to the west being greater than the space between the two rows to the east. The body of the building does not lie exactly on an east-west axis.
As illustrated in ‘Period 1’, the four rows of roundels depicted, on the east row, labours of the months, the next row bearing signs of the zodiac. The two western rows illustrated virtues conquering vices, and mythical beasts. The pavement then developed with the insertion of the new Cosmati feature illustrated in ‘Period 2’, most probably prior to the marriage of Henry III in 1236.
In the 1440s, twelve roundels from the two rows to the east were removed to allow the insertion of the new pavement, and twenty-four were organised into two groups in the north-west and south-west corners of the redesigned pavement as illustrated in #3 immediately above.


Here is the illustration of the central feature of the pavement that first caught my eye for its strong geometrical relationships. This suggested to me that it might share something of the character of the constructional relationships found in geometrical Islamic patterns. However, the design is not as integrated as that at Westminster, by contrast this design showing elements laid on top of each other and, on inspection, not being as integrated a design as the Westminster pavement.
At first sight, and looking at a simplistic diagram of the underlying elements of the pattern, it appears that the shapes have obvious mathematical relationships. To test this an accurate drawing was attempted but proved difficult to reconcile with the illustrated pavement, perhaps because of the guesses that had to be made.
For instance, the four squares shown in maroon appear to have sides in the proportion of 300:180:80:30; the large circles shown in blue have a diameter of 150 and are spaced 50 apart, their centres consequently 200 apart; but the four clustered circles in the centre, shown in maroon, have diameters of 77 if they have a common point of grouping at the central point of the pattern, and they do not appear to have an exact tangential meeting with the larger circles as might be anticipated.
The maroon setting out lines have been organised to fall on the centre lines of the bands of pattern which make up the overall design, as that is the most likely way in which these designs might have been established. Blue lines mark the centres of the circles. At this scale it is very difficult to determine the width of the running bands, but they appear to differ slightly in their widths, from 15 to 18, though this is tenuous and would require a more accurate measurement of the pattern in place to confirm.
It seems that the design of the pavement would not have had the character of thought put into its design that might be anticipated as a more clear geometric basis would have made the laying out of the design easier to accomplish.
This brief look at the underlying geometry of the pavement suggests that the setting out has not been carried out in a manner similar to that which Arabic artisans used in organising their geometrical approach to pattern design. If this is so, it suggests this was not an issue with European craftsmen at that time, leaving open the question of what their design parameters would have been.
One point remaining to be examined is whether or not the setting out relies on a mixture of geometries based on both the centre lines of bands as well as on their sides.
more to be written…
Celtic geometry

Here is another small detour, one illustrating a different character of pattern. It is recognisably one of Celtic origin and would have been common in Europe for centuries. The reason it is placed here is to illustrate another distinctive type of pattern which contrasts significantly with Islamic patterns. In fact Celtic patterns, or at least the Roman designs which led to them, pre-date Islamic patterns by hundreds of years. Having said that, there would have been Arabic patterns which would have contrasted with Celtic designs from that period. The two chief characteristics of Celtic designs are their interweaving and cursive patterning.

The pattern above originated in an early 1970s design for a carpet, this image being a photograph of one of the original crude concept sketches, the others now lost. The point to bear in mind is that the design was conceived as interweaving strands and took no cognisance of an underlying geometry which would have tied the whole of the pattern together in a manner similar to that defining Islamic geometries. Although it does appear to have a rigid underlying geometry it is, in effect, a free-form design and, working on it, I recall the feeling was quite different from that accompanying the development of Islamic designs.
Typically these designs are based on characteristics reflecting the use of flexible materials. Because of this their setting out appears to be more simple though is actually more complex than most of the Islamic patterns demonstrated on these pages. Because they are commonly referred to as knot patterns it suggests that the designs are based on rope constructions and, as such, may have originated in formal arrangements of materials commonly in use both on land and at sea. The formality may have had a significance both in the points upon which the geometry is based as well as the use of interlocking and continuous patterns. The design above, for instance, is worked from two reflecting continuous lines interlocking with each other, and illustrates one of the chief characteristics of these patterns – their regularity and symmetrical arrangements.
Maritime traditions have always required lines, or ropes, to be kept safely, treated properly and never cut, the latter severely restricting their use. It is probable that the splicing of the ends of lines was preferable to whipping them, and this will have led to decorative treatments once lines were constructed by twisting ropes together in order to strengthen them. Not only were lines spliced at sea but mats were also created by weaving lines.
At first sight the design above appears to have a layout which might be easily constructed geometrically. It contains a central circle, what appears to be some simple plaiting and lines which reverse themselves in the corners. However, there are difficulties with laying it out whether it is attempted to set out the individual lines, or to set out the space between them as a single tape or line.

This animation illustrates how the points setting out the circular elements bears no relationship to the diagonal lines. One particular discovery with the final, constructed rug, was that the four end finials are twisted inwards slightly, something that would certainly not be found in traditional Islamic geometrical designs, though might be discovered in more cursive or freestyle designs. It might be imaginative, but the two interlocking designs may be thought to resemble two human figures. It might be possible to create a similar design which can be set out accurately, but that is something I shall leave until a later date.


Here are two illustrations of the finished rug. Because of the passage of time, my attempt to replicate it forty years later owes much to intuition rather than geometric fidelity. As can be seen from these two photographs, the actual design is slightly different from the graphics placed above.
In particular I now recall that I had intended that the loops pointing towards the four corners were intended to turn and link with the semi-circular elements of the alternate colours, but I find it difficult to remember why this was not carried through in the final design. Looking at it now with the benefit of time I can see that there is likely to have been a difficulty accomplishing a smooth design geometry with the corner loops turning inwards to make the link.


Now, over fifty years later, the design has been revisited and an attempt made to see how it might have been designed with the end finials returned to link with the end semi-circles. There is still some way to go as there are many elements of the design that might be amended. Generally these are geometric shapes which seem to guide the eye and look as if they should be better related.
The first of this group of illustrations, in blue, shows the basic design unit used as a running design and which, mentioned above, resembles a figure though I now see that it might also be seen as a bearded man wearing a hat, a bit like a Puritan, perhaps… But I digress.
The next pair of illustrations are two of a number of attempts to revise the design showing the finials being returned and linking with the end semi-circles. The first of the two is the one I prefer, the second of the two requires the end finials to be enlarged in order to bring them closer together but makes the junction with the semi-circle more difficult.
The final graphic, an animation of the preferred design, illustrates how the design changes when seen in outline, as a flat pattern and as two interlocked design elements in a similar manner to the original design. However, there is still room for a little more examination of the design. Bear in mind that this is only one example of a style related to Celtic designs.
Roman influences


The pattern illustrated here is not Islamic but precedes it by centuries. It is probably Roman and may even be earlier, depending on its effect for the intersection of arcs created by the repetition of equal sized circles around a central circle. It has been located here as it has affinities with Islamic designs in that its construction is similar to many Islamic patterns created with circles, the difference being in the number of circles used to create the pattern, in this case, forty-eight. The first of these two illustrations shows a construction in its basic form. It is one that has been used both on flat surfaces as well as in three-dimensional constructions. The second shows a notional decorative pattern created by the colouring the triangular shapes with a simple design.


A second distinction is that the intersecting circles do not cut through the centre of the basic circle as many Islamic patterns do. The left hand pattern here illustrates the completed forty-eight intersecting circles, showing that they share a common tangent with the inner white circle. In the masked pattern – that on the right here – note that they do not meet at a common tangent with the central small circle but intersect with it. The circles are trimmed both by the small central circle as well as at the outer edges of the design. The reason for this is evident, particularly in the first illustration above. The triangles formed by the intersecting circles become increasingly small towards the centre and flat towards the perimeter making them difficult to construct in the usual materials. Trimming them appears to be an arbitrary procedure and here I have reduced the number of concentric rings to twenty-four. The diameter of the central circle was arbitrary as was the number of rings selected. There is obviously scope for many decisions that will affect the overall appearance and pattern.

Here is an animated illustration showing how the above pattern was constructed. There are many construction lines missing from this diagram but they should be apparent as the construction progresses. This may help in the initial stages.
Begin by drawing the base circle and add horizontal and vertical lines through its centre followed by two diagonals, also through the centre, projecting all of which to intersect the circumference. The intersections of the horizontal, vertical and diagonal lines with the circle circumference will create a number of points from which similarly sized circles can be described. These, in turn, will create intersections enabling lines to be drawn through the centre at 7.5° increments, dividing the circle into 48 parts.
Select two intersections, fifteen spaces apart as shown, and connect them. These will intersect with one of the diagonals at 90°. Select a third intersection, three spaces away from the first point as shown and, with the centre at the intersection of the chord and diameter, and with its radius set to the third intersection, draw a circle. Repetition of this construction, or with any method you prefer, complete drawing 48 circles around the circumference of the base circle.

Select and mask some of the outer rings of triangles together with some of the inner rings where the triangles are too small or flat to deal with sensibly, and then decorate as you wish. The design of this pattern, though not its colours, is taken from a Byzantine pavement located in Cyprus, for which I am indebted to a correspondent. I believe there are twenty-five concentric rings in its design as opposed to my twenty-four.

Appearing very similar in concept to the patterns above, here is a variation of it that is relatively simple to draw – though there are always going to be problems with the detail towards the centre of these geometries due to scale. I have not set out the construction lines as they are not difficult to establish, compasses and a straight edge being sufficient, although his has been drawn in an illustrating programme.
The chief distinction is that the arcs created with their centres set on the outside circle all have the same radius as the circle and, therefore, pass through the centre of that circle where they interconnect. In order for the pattern to work, therefore, rings of circles must be omitted at the centre in order to leave a space there.
This pattern again begins with the circle divided into twenty-four divisions. As with the majority of these geometries there are obviously a number of ways of establishing the patterns, dependent upon which points are decided upon as the basis for joining lines. In this case the small circles have their first diameter determined by joining the intersections of the six interlocking rotating squares. Subsequent circles have their diameters established by joining the points of intersection between the radials and the inner sides of the previous small circles.
One significant difference between this pattern and those above is that the rings of similarly-sized leafs creating the pattern do not touch those adjacent to them.
An Italian Fibonacci-based design


My attention has been drawn to an extremely interesting tarsia design that has been created using the systematic application of Fibonacci proportions to establish the setting out of the pattern. The design has relevance on these pages as it is constructed in a very different manner from those generally employed in the production of Arabic or Islamic designs and enjoys a subtlety due to its geometric character.
Now restored, and at a casual glance, the pattern appears to enjoy similarities with some Arabic or Islamic patterns. But it was created in Pisa, the Italian city where Fibonacci was born around 1170 AD, and its construction possibly dates from the 12th century when the façade was established.

The pattern is presented as an inlaid marble tarsia within a lunette set into the façade of the external entrance wall of the church of San Nicola, Pisa, and is located around five metres above the external pavement level. As can be seen from this photograph, the tarsia in its lunette appears to be part of a continuous façadal design with differing treatments that was interrupted by what appears to be the later intervention of the entrance doorway.
What is particularly interesting – and why the tarsia and an appraisal of its underlying geometry has appeared on these pages – is that the pattern is not developed in the familiar linear manner illustrated in the notes on Fibonacci discussed on another page, nor is it developed with the lineal continuity that characterises much of Arabic and Islamic pattern design.

The design of the tarsia is established with the placing of circles within a simple geometric framework, those circles having diameters that correspond with the Fibonacci sequence. This is not a basis for a continuous pattern as will be seen in a closer examination of the tarsia. In particular, there is discontinuity between the cursive and straight elements of the pattern.

Because of this method of setting out, the design is slightly more difficult to construct, and would have required relatively accurate measurement by the designer as it would have been necessary to establish circles with the relative diameters of 1, 2, 3, 5, 8, 13, 21, 34 and 55 – although the geometry that is most relevant here depends only on circles of diameter 5, 8, 13, 21, 34 and 55.
While the pattern is capable of being constructed with only a pair of compasses and a straight edge, it is not known if the diameters of the circles were measured out using a marked ruler, or if they were established independently of the pattern using a descending sequence of constructions. Either would have been possible at the time, though the former is probably the easier and more likely method.
This note intends to give only a general view of the tarsia and, in particular, the character of its design construction; a more detailed study in which the full design has been set out can be found in this paper, which is strongly recommended to those wishing to see a more comprehensive exploration of the thinking behind the design of the tarsia and its associated lunette.
Please be aware that the following animated graphic is not intended to be a constructional guide. Its purpose is mainly to illustrate the character of placement of the underlying geometry in this type of pattern making. A step-by-step construction can be found in the paper previously mentioned.
The pattern has been constructed within a square that circumscribes a circle which has a diameter of 55 units. From the centre of that circle, three more concentric circles are drawn with circumferences in the ratio of 34, 21 and 13 units.
On the 21 circle a square is circumscribed and a copy rotated through 45° to create the framework for the central octagonal feature of the design.

From the points of intersection of the two squares – the internal angles of the octagon – lines are drawn through the centre of the circle connecting opposite points. These lines intersect with the 34 circle and, centred on these points of intersection, eight circles of diameter 21 are drawn that will meet at tangents the outer 55 circle and the inner 13 circle thus creating the framework for the eight strong circular features of the pattern.
Two rectangles are drawn at right angles to each other, each tangential to the central 34 circle and, coincidentally, the eight 21 circles. These are in the proportion of golden rectangles. The diagonals to these two rectangles are used to establish the centres of eight 3 circles whose centres lie on the diagonals and their circumferences tangential to the longer side of the rectangles.
Two squares, set at 45° to each other, are now added, their corners internally coincident with the 55 circle. The horizontal and vertical sides of one of the squares is extended to meet the external, bounding 55 square, creating small squares in the external corners of the tarsia.
Diagonals are drawn across each of the corner squares and circles of 8 diameter inscribed. At the junctions of these circles with the diagonals each square has four circles of 5 diameter drawn.
From the opposite corners of the small squares – those lying coincident with the 55 bounding square – two parallel lines are drawn diagonally across the design to meet the corresponding corners opposite. Copies of these pairs of parallel lines are rotated through 45° to intersect the bounding 55 square.

From the centre of the pattern a circle is drawn whose diameter is 44.5, this being half the sum of the Fibonacci sequence of 55 and 34. Along this circle, and at its intersections with the lines passing through the centre and the internal angles of the octagon, alternate circles of diameter 1 and two are placed.
In order to produce the inner setting out line within the eight 21 circles, circles are drawn with diameters of 17, this being the median diameter between the 13 and 21 Fibonacci diameters.
A number of small circles complete the disposition of the geometry behind the pattern. One of the characteristics of this arrangement is that these circles are discrete and do not coincide with the lines forming the larger part of the pattern. This, then, is one of the main distinctions between this Italian work and Arabic or Islamic patterns, a second distinction is the lack of continuity in the lineal elements of the pattern though there is a degree of three-dimensional treatment given to the tarsia by the apparent overlapping of lines.
As mentioned above, the additional lines that help create the interleaving double line effect are of a diameter that is half that of the 13 and 21 diameter circles – 17. The distance between the two diameters of the pairs of eight circles is the same as that used to create secondary smaller squares at the centre of the tarsia.
It might be argued that by using circles of diameters median between two Fibonacci numbers, the design is less pure and that the diameters should have borne a more direct relationship with Fibonacci or the Golden Section, but designers regularly make adjustments to their work in order to resolve visual issues they see. Perhaps this is a case in point.
Decisions such as this, together with the use of circles whose diameters do not meet each other or lines tangentially are in marked distinction to the geometries found in Arabic and Islamic patterns. It is notable, as was mentioned above, that the cursive and lineal elements of the design do not flow into each other.
This note has concentrated on the basic setting out of the tarsia. More refinement has gone into the production of the final design, and that is dealt with in the paper mentioned earlier. The design is a sophisticated development based on the Fibonacci progression and, due to this, appears to have had its underlying geometry unnoticed for centuries. Because of this, there is the possibility that other, similarly based designs exist, if not in Pisa, then elsewhere.
Maritime influences

Much of the discussions on these pages relates to the geometries found in nature and their development into decorative designs. While there has been mention of marine influences being similar in most respects to land-based examples, there is another field where pre-Islamic and Islamic practices have developed geometric solutions in dealing with specific problems faced in day-to-day operations. It is not my intention to write a great deal on this subject, but just note a specific area of relevance, here illustrated by what is known as a Turks Head knot, and which represents a family of knots. They can be used both both functionally as well as decoratively and here represent a maritime relationship with geometry.
There is a strong maritime tradition in the Gulf. It is not suggested that the use of lines and ropes was unique as their use would have developed coevally around the world. But those who had to work with lines or ropes in their daily activities had a need to resolve problems associated with their use and storage. Two related fields of work evolved – knots and splices – most of these characterised by a geometric rationale which would have resonance with the decorative patterns met by them on land.
Traditionally, sailors never cut lines unless there is a specific need to do so. In order to preserve, shorten, organise and hold, a variety of devices were organised generally coming under the groupings of knots or splices. The specific Turks Head knot shown above, for instance, was used to form an end to a line giving it both an additional handholding capability as well as weight in case it had to be thrown. But essentially, it is a decorative feature. Other knots were developed to hold an item fast, contain regular or odd-shaped items, or hold its position permanently or temporarily. All these knots had a logic to them, many of them regularly formed on three-, four- or six-part geometries, this being related to the number of strands used in the formation of the line or rope.

Generally the Turks Head family are termed knots, but can often be seen formed as the end of a splice, the latter being a way of finishing the end of a rope to stop it fraying. This example is a simple splice developed for this purpose. The strands of the end of the rope are teased apart, laid over each other to form the new end of the rope, and then worked back through the strands of the rope in a symmetrical manner to fix the end of the rope. This results in the thickening of the rope while not weaken it.
Other forms of this type of knot were worked into flat mats and used for decorative or utilitarian purposes. In nearly all cases, there appears to have been a regular pattern formed, perhaps because of a natural tendency we have in us to create order.
more to be written…
Design variation

Over time designs were developed by different cultures around the world which were based on naturalistic and geometric forms. In the latter there appear, on first consideration, to be very few possibilities for variety as there are only a limited number of two-dimensional geometries on which forms or patterns can be based. But the reality is that the amount of variations on a single, geometric theme appear to be infinite, the variety being created through relatively small differences in the rules selected to form each design, as well as through a combination of different geometries. Even though this development of patterns based on two-dimensional geometry pre-dates Islam, this character of the decorative arts is now firmly associated with Islamic design.
I made the above animation to demonstrate something of the variety that can be found within two-dimensional geometry. It illustrates a number of design variations created by Bourgoin in his book on Arabic tessellations, published in 1879 with the title ‘Les Eléments de l’art arabe: let trait des entrelacs’, but now made more freely available in English, although without the original text. Bourgoin’s work has been used by many scholars in their investigations into the basis of interlace patterns, tessellations and the geometries used in Islamic designs, but many others, such as Issam El-Said, Critchlow, d’Avennes have also worked in, and developed this specialist area.
Pattern variations on a hexagonal shape

Many of the shapes above have been created on the basis of six-point geometry and are constructed by the methods shown on other pages of these notes. Essentially the individual elements are established from a central point around which the first hexagon is constructed. Lines are then drawn within and outside the hexagon linking geometric intersections, and this geometry is developed to create discrete lines or areas that are used to delineate the patterns envisaged by the designer.
But another way of creating patterns is to start with a basic, regular hexagon and move copies of it a specific distance away from the original hexagon, the intersections of these two hexagons – together with the other five hexagons surrounding the original hexagon – producing a variety of shapes. This illustration is of the original hexagon with its underlying construction and a few lines connecting its corners.

This animated sketch illustrates the moving of copies of the original hexagon by increments of a third of the length of a side – in blue, and by a quarter of the length of one of the sides – in red. Continuation of the animation shows how the hexagons relate along the central horizontal width of the hexagon, creating overlaps of eighths and sixths of the width of the hexagon. It is probably easiest to think of these relationships as overlaps of one hexagon with another; having this overlap considered as a third or quarter is also a way of simplifying the relationship but has the advantage of easier construction.

As can be seen in the above animation, there are a number of obvious relationships capable of construction based on the simple movement of a copy of a hexagon into, or away from, a central hexagon. Here the overlap is a third, and hexagons are constructed to overlap a central hexagon, constructing diamonds and triangles at their intersections.

These can be readily developed to produce simple infinite patterns. Here is an illustration of this particular pattern where the hexagons overlap by a third. As with all patterns, the colouring of the individual elements can create very different effects on the viewer, a common tendency being to have lighter colours allocated to the larger elements with the smaller ones used to create contrast. Here a simple palette has been selected with a blue outline used to edge the tiles for contrast.

Compare this illustration with that two above. Here the hexagons have been moved by two-thirds of the length of one of the sides of the central hexagon, compared with one-third in the above illustration. While diamonds can be seen within the original hexagon, they overlap. Outside, diamonds can be seen pointing towards the centre where a hexagonal star sits.

The resulting pattern has been constructed with diamonds, a six-pointed star and a three-legged element. Although this pattern has been coloured differently from the example above, it can still be seen to present a very different character of pattern – yet the underlying geometry is very simple, with only a slight change in the positioning of the overlapping hexagons from the original.

Here, again, is a variation that looks very different in terms of its two-dimensional as well, of course, as its colour. This time the basic hexagon has been moved by half of the length of one of its sides to create a different effect. Note that this pattern is only capable of providing two shapes, whereas the two above both have three shapes and, as a consequence, lend themselves to more interesting and diverse patterns through colourway variations.
Other effects can also be produced moving the hexagon by a measure greater than the length of one of its sides, as is demonstrated by the animation above where the hexagon is moved additionally outside the length of the side of a hexagon by increments of 1.33 and 1.66 – the blue hexagons – and by 1.25, 1.5 and 1.75 – the red hexagons – respectively.
more to be written…
Origin of design?
It is impossible to know the extent to which pre-Islamic geometries, and particularly those associated with ritual geometry lie behind the rich patterning with which Arabic and Islamic buildings are now covered, but there may well be strong atavistic tendencies which recognise or at least are satisfied by immersion in the rhythms of the geometries. Within Islam there has developed an art which illustrates an infinite variety, and which permits and encourages contemplative reflection.
This represents the development of non-naturalistic Islamic art and is thought to be one of the most powerful forms of sacred art, and not just an abstract art in the modern sense of the word. However we view Islamic patterns, there is a potent source of contemplation in observing its varied patterns. It is my own experience that, looking at the patterns within Islamic buildings, it is easy to see geometries forming and re-forming in an endless profusion. Yet the method by which these patterns were created is relatively simple depending, as it does, on clear geometric development.
Although it may seem counter-intuitive, there seems to me to be a connection in this with Japanese Zen Bhuddist philosophy. Contemplation of a restricted vocabulary of objects – traditionally, raked sand and rocks, planting and containing walls – can produce in the viewer the effect where time and space collapse or dissolve in a similar manner to that experienced in the contemplation of Arabic tilework. This suggests that there is a need in all of us to find a mechanism that will permit us to escape the immediate pressures of life, and allow our minds to wander. In Zen this becomes a form of meditation that is designed to encourage and lead to enlightenment. The major difference between Zen and Islamic contemplation would be the focus Zen has on the natural world with its three-dimensional forms and their association with nature. In Islam, tilework is not dissimilar in its effect, although may not have specifically developed for this purpose. Perhaps tilework has evolved as a subconscious exercise which, while bound by the rules governing Islamic illustration and decoration, produces a very simple palate of pattern and colour, allowing the mind to contemplate the infinite.
Unity
It is argued by Seyyid Hossein Nasr in his foreword to Keith Critchlow’s book on Islamic patterns that a doctrine of unity is central to Islam and that it manifests itself not in iconography but in geometry and rhythm, arabesques and calligraphy. More particularly he argues that a sacred – not just an abstract – art developed based on mathematics which goes to the very heart of Islam.
The treatment of surfaces
Surface treatment of buildings in Islam appears to enliven the defining forms of the spaces. Interplay of form and decorative elements of the surface bring meaning and spiritual exercise for the observer, the more so with the voluntary or involuntary intellectual exercise of deconstructing the meaning behind the geometric framework. In this way the viewer is more than an observer; the viewer is a participant. At its best, this enlivening brings motion to static building, consolidating the harmonies and enriching the user of the building and, in the situation where the building is integrated with its setting, establishing a strong link with the geometries of nature.
Yet the patterns on buildings are generally two-dimensional, there being no real perspective design work in Islamic art, particularly in pattern design. There may, however, be patterns placed on patterns which can give an illusion of depth and, in timber and naqsh work there may be actual three dimensional construction, though this is really a projection of two-dimensional pattern. Sometimes the illusion of depth can be found by the implied weaving of pattern lines above and below each other.
Moreover, it is a common feature that containing frames tend to appear arbitrary, implying the continuity of pattern beyond the frame that the brain sees, comprehends and mentally extends as part of its normal working. This is in sharp contradistinction to Western art, where the frame generally comes first and the work is formed within it, often having a direct relationship with the frame.
Reading patterns
Although I have written notes about it elsewhere, it would be useful to place a brief note here on the reading of patterns. The notes on the page dealing with perception essentially argue that Arabs will tend to read what they see in front of them from right to left, compared with Westerners who will read from left to right. Both these patterns of reading apply not just to writing, but to the whole of the visual field in front of the viewer.

Arabic or Islamic patterns, by their very nature, do not have a direction implicit in their geometry but tend to be formed in fields with no apparent ending. As I noted above, the framing of patterns, whether on a document, piece of furniture or on a wall, tends to be arbitrary, as is illustrated in this drawing to the right where the pattern can be thought to stop at the top and bottom. But the scale of this drawing also brings out another view of the pattern, enabling the viewer to read the pattern as being composed of three ribbons, one set vertically and the other two running at 30° to the horizontal.
In this sense, even if the viewer’s inspection enters the piece from the right or left, the piece will be read in an irregular manner, the eye following lines or elements traced out in the pattern, and reading both explicit and implicit patterning within, and even outside, the pattern as the subconscious search for unity takes place. The upper drawing here illustrates the way a field pattern may be seen.

In this lower drawing, where the geometric pattern is focussed and not in the form of a field, then the eye is likely to move first to the centre of the design as this is the point from which the geometry is driven. In most cases this will mean the centre of a circle or, as here, the point derived from a circle, as most Islamic geometry is derived from either a circle or square, the latter implicitly also associated with the circle, and with the grids formed usually being based on equilateral triangles or squares.
While this note implies that we read patterns formed of lines, it is necessary to understand that we also see patterns as shapes created by the lines. Depending upon the way in which patterns are formed – and this is an exercise effected by the creation of lines – these patterns can be focussed as shapes which are recognisable and the focus of our view, or as the negative spaces between those shapes. These are usually referred to as figure and ground. The negative spaces are often shapes in themselves, and it is a function of the eye and the brain that we can not see both the space and negative spaces at the same time, but that the eye must switch from one to another. There is also a complicating factor in the manner in which our eyes scan.

This first illustration is a line drawing constructed by creating a number of circles which intersect with each other on a right-angled grid. It is a common pattern in Arabic and Islamic geometrical design work. The sinuous lines have equal weight and the spaces contained by the lines are equal in their visual weight, though alternate shapes appear set at right angles in a regular pattern.

By colouring the shapes oriented in a single direction in blue – in the first case, those aligned horizontally – a pattern is created of considerable strength. This tends to be the focus of the brain. But the white ground on which the blue figures sit constitutes a series of negative spaces and can also be seen and appreciated as a pattern in its own right. As mentioned previously, the white pattern and the blue patterns can not be easily seen at the same time, the eye tending to concentrate on one then the other, rapidly moving between them.

When the blue and white, figure and ground, are reversed, the pattern is exactly the same but the manner in which we experience it slightly different. In this case, the movement of the visual axis from horizontal to vertical slows the travel of the eye across the pattern, creating a different effect in the viewer. Yet the patterns are exactly the same, one being turned at right angles to the other.

In this final sketch, the basic geometrical construction of interlocking circles has been laid out and, within it, four simple shapes – excepting the basic circle, which would be a fifth shape – have been picked out illustrating how shapes of different character can be identified and used to produce patterns. In this case they are shown as running patterns, but obviously can be applied as aggregations – as are two of the shapes – or as individual shapes. Understanding the basic geometry enables the viewer to read the overall patterns more readily and, in so doing, identify with their complexity.

The simple axehead design illustrated above is found in many parts of the Islamic and Arabic world, and elsewhere. Its construction, as noted, is relatively simple to establish being based on a grid of overlapping circles regularly spaced in two directions. There is a brief note on another page.
Here it is used as a running border of three horizontal and two vertical axehead elements, within which a decorative pattern is contained. Above the panel is another of a different character, one incorporating Arabic calligraphy.
This decorative geometrical panel, situated on a wall of the Alcázar, Seville, Spain, seems at first glance apparently simple to set out with its commonly found design elements of interlocking six-pointed stars, leaves and triskelions; however it is more challenging in its construction and also more interesting in its overall application.

The grid on which the pattern is based has an irregular disposition of circles which requires a little effort to establish. To simplify this animation a few lines have been omitted, though it should be obvious which are required in order to complete the framework.
Begin by drawing a circle and, using this as a central element, construct six more circles each contingent with the circumference of the first circle. This creates the basic group of seven small circles.
Draw a line through the centres of two circles on one side of the group of circles extending it up and left. In this case two circles on the lower left have been selected.
On the extended line draw two circles, the first having its centre at the intersection of the extended line and upper circle, the second circle constructed with its centre on the same line and its circumference touching the first of the two circles.
These two circles will become two of the outside ring of six circles of a second group of seven. In order to construct this second group, a circle needs to be added, its circumference touching both of these two circles and being the central circle of the second group.

So far the construction has created two groups of seven circles, each with an internal circle establishing the position of the outer ring of six circles. In order to create the next family of the grid for the overall pattern, the second of these two groups of small circles needs to be copied around the first group of small circles creating a larger set of groups of circles. Extension of this group of seven groups creates the grid on which the layout was made, this graphic illustrating the pattern that has been developed.
Each of the groups of six circles has been shown with a seventh, central circle, but that circle is redundant in the setting out of the overall grid. In fact the circumferences of the surrounding six small circles create the central six-pointed stars which appear white in the two graphics immediately above and below.

So much for the construction of the pattern. The next point to note is that the construction shown above has been made with the groups of circles being symnmetrical about their vertical axis. But if you look at the pattern in the photograph above you will see that it has been rotated approximately 11° anticlockwise, – in fact 10.8934° – in order that the elements of the pattern, the stars, leaves and triskelions line through horizontally. The patterns can be compared in these two images where it is notable that the rotated pattern appears to be a little more lively to the viewer.
The triskelion or triskeles

Related to the pattern above is this illustration which appears on a number of sites. It has been impossible to find the original which appears to have been taken from an Andalusian document.
The triskelion is commonly related to Celtic designs though various forms of the design have been found in many areas of the world going back centuries, if not millennia. The previous design, above, relies heavily on its form, and many other versions of the shape can be found in Islamic design work around the Mediterranean.
Here it is paired with a heart shape, the two figures, treskelion and heart, held within a regular hexagon, but the treskelion having a slightly different construction.
The triskelion shown in the note above is just one in a number of patterns in which it is used as an element. Looking at the construction of this particular shape it can be seen that it is not perfect in its construction, though in some forms it can be.

This animation misses out a small number of construction lines, but they should be evident. The initial construction is made within the lowest of the equilateral triangles created by joining the six corners of the hexagon.
Drop perpendiculars from each of the three corners of the lowest triangle and then bisect the angle of 60° between the top vertical perpendicular and the right side of the lowest triangle. With the point of intersection between that and the line bisecting the bottom right corner angle of the triangle, construct a circle which meets the right and bottom sides of the circle and the central, dropped perpendicular as tangents. Add two more similarly sized circles which touch each other and the two remaining sides of the triangle.
With its centre at the centre of the lower right circle, draw a larger circle with its radius at the distance of the centre of the top circle. With its centre at the point where the large circle intersects with the right side of the triangle, draw a circle of the same size as the other three small circles. This will sit directly above the bottom right small circle.
At the intersection of the large circle and the line previously drawn bisecting the top angle of the triangle, draw a smaller circle forming a tangent of the right side of the triangle and the vertical line from the top of the triangle.
Using a combination of the fourth circle and the smaller circle to abstract their combined shapes from the top circle will create one leg of the triskelion. Repeat this construction on the other two corners to create an incomplete triskelion.
The small gaps between the three elements of the triskelion can now be joined, and the central gap between the three elements filled to create the finished triskelion.
Copy this triskelion and rotate it about the centre of the hexagon each time through 120°, and then mirror and copy it into the remaining three positions to create the final pattern.
Symbolism in design
There is evidence that there are symbolic messages contained within geometric designs. Religious and numerical clues have been found by those carrying out refurbishment of Islamic buildings. These relate to the numbers relating to the names given to God, and the derivation of the patterns contained within the overall scheme. The panel below, for instance, contains ninety-nine elements – the same number as there are for the names of God. But the subject is complex and will not be dealt with here for some time.
Relationship between art and mathematics

In addition to issues relating to symbolism there is a very strong link between art and mathematics, particularly numbers. There are studies and considerable evidence of the intellectual interplay of mathematics and design such as occurs in the Alhambra in southern Spain. Much of this is based on Pythagorean mathematics and there are a number of theories explaining the manner in which mathematics is incorporated into buildings, both in their overall design as well as their decoration.
Put simply, Pythagoras believed that the intrinsic character of numbers reflected Nature. It followed that, if the character of Nature can be known, then the nature of numbers can be determined. Abstract concepts were held to be expressions of number; Justice, for instance, was thought to be four, and the Universe, ten.
more to be written…
Geometry in plants

This, of course, is not a photograph of a plant, but of bees in Qatar working on their honey comb. It is here as a reminder of the geometric form in which bees create the structures of their honeycombs, a characteristic of which most people are aware, and a geometry related to other areas of the natural world. This simple form has an intrinsic beauty, utilising in its creation such an economical and structurally sound geometry. This is one of the important features found in the world around us.
Whichever of them you look at, plants, particularly flowers, tend to have only a small number of geometries behind their two-dimensional geometry, although their variety seems to be infinite. The following photographs of flowers illustrate some of the most common two-dimensional patterns found in nature. Not every flower is regular in this respect, but I have generally sought out plants which display a relatively simple two-dimensional geometrical form. Bear in mind that many plants have irregular geometric forms and that some combine two or more geometries as may be seen below where three, five and ten form the basis of the flower’s pattern. The three-dimensional nature of these plants make their forms even more complex, of course.

Despite that, there are many natural forms which are not regularly geometric in their appearance, though it might be thought, at first sight, that they are. This photograph illustrates such an example, and is of the skin of a honeydew melon which has a strongly defined pattern running over it. Contemplating patterns such as this is an interesting exercise. The first impression is of there being an underlying framework governing the pattern composed of a variety of geometrical shapes and sizes, but these forms slip in and out of sight as the eye scans over it. As far as I can tell, there is no geometric framework, however, the characteristic of an apparent infinite ground, albeit irregular, has much in common with certain Islamic geometries where there is an ability to establish patterns which have no repetition in their overall placement. But let’s look at regular examples.
Two, four and eight point


These first four photographs, shown to the side, illustrate flowers that have, respectively, two, four, four and eight petals. Despite this, and although four petals might be thought to be the simplest form of geometrical arrangement, it is flowers with five and six petals – and, of course, plants and other natural forms – that seem to be the more common and appear to predominate in the world around us.
When you look at the two, four and eight petalled flowers their shapes appear to be far more balanced and stable in terms of their geometric appearance because we tend to equate them automatically with the character of the square or rectangle, symbols of stability in our experience of two and, particularly, of three-dimensional forms based on them. In fact in English we use the term ‘foursquare’ to mean solid, honest and forthright. This quality is especially obvious in the two photographs of the four-petalled flowers, though notice that the white flower, by virtue of its being photographed at a slight angle, looks more active or lively than the horizontally located green leafed plant below it. This effect is something I will discuss briefly a little further down the page.
The eight-petalled white flower has also a stability apparent in it though, by virtue of the photograph being taken with single petals top and bottom – as opposed to a pair of petals top and bottom, again an effect discussed further down the page – appears to be both stable and active. This is not to say that other geometries appear less stable, but it is a characteristic of evenly numbered geometries that they appear more relaxed and balanced due in the main to their symmetry.
Five point


However, as I mentioned above, it is five- and six-pointed geometries that seem to be the most commonly seen and experienced in the natural world. I have to admit that I’m not sure whether five or six divisions are the more common, but my impression is that it’s likely to be the six-pointed.
Having said that it is the five- and ten-pointed geometries which, being based on the proportions of the Golden Section discussed on the next page, might be argued to represent a more perfect proportion for plants, compared with those based on other geometries and are, therefore, likely to be considered more attractive in that arrangement.
Looking at the different forms five-pointed geometries take – illustrated with these six photos to the side – the plants do seem to me to have a more interesting or exciting form than those based on four- or six-pointed geometries, though the reason for this might be relatively simple and is discussed and illustrated below these photographs of flowers, most likely having something to do with the regularity and balance of even and odd numbers.
Odd numbered divisions of petals – or any other natural or mechanical form for that matter – have an intrinsic visual disbalance that creates a more interesting or visually stimulating appearance for the viewer. The two photographs of blue and white flowers illustrate something of the phenomenon well, particularly if you compare them with the four-pointed geometries above and the patterns in the next group of photographs illustrating six-point geometries. They are both very small plants with the flowers occurring in clusters, but the flowers both show how the sub-divisioning works. The next to lowest of these photographs shows a five-divisioned flower with the petals arranged in pairs, creating an interesting combination of formality and informality for this particular plant.
Although I may appear to be making a case for one form of geometry being more attractive than another, that is not the case. With reference to Arabic geometry don’t forget that typical patterns can, and often will, mix more than one type in their overall form.
Six point


Compare the two photographs above illustrating five-point geometry with the four- and eight-pointed geometries above them, and the three based on six-pointed geometry below them. While the first two photographs here show balance and a calmness created by their even regularity, the flowers based on five-pointed geometry do look to me more interesting in the irregularity of that geometry. I should add that by using photographs which have the six-point geometry balanced on a point, they are a little more lively than when rotated through 30°. Perhaps this is the reason I have more photographs of five-point geometry than I do of six-point geometry in my files – and why I have the feeling that there is more five-point geometry than six-point in nature. Anyhow, the point I am trying to make is that both five- and six-point geometries can be readily found, and that they create a slightly different feeling caused by their odd and even geometrical bases.
Having said that, the lowest photograph here, illustrating six-point geometry in a tulip, shows a more lively form by the uneven opening of its alternate petals suggesting three-point geometry, reinforced by the three-point form of its stigma. However, the six anthers correctly reflect the six-point geometry reflected in its petals. But there are other geometrical bases for plant forms.

It may seem unusual to see snow crystals on a page dealing with Islamic geometry, but I wanted to emphasise the point that these geometries govern designs to be found all over the natural world. Snow crystals take many different forms, but the majority of them are based on six-point geometry though, as the crystal on the right demonstrates, they may also have a basis in twelve-point geometry.

The more you look at the natural world, the more likely you are to see that everything is not as perfect as you might expect. But even when there is diversion from the norm, beauty may still be seen in nature’s variations or imperfections, particularly in its geometry. Here are two photos of primulaflowers. This to the right has the regular form with six-point geometry demonstrated in the disposition of its anthers and petals.
Seven point


This primula, though, demonstrates the far more rare seven-point geometry as the basis for its petals. Even though the higher of these two photos demonstrates a more active balance in the shape of the petals – as discussed below – it can be seen that the lower, seven-point geometry is more interesting, as I argued in the previous paragraph. Both flowers are also enhanced by the contrasting colours of their petals and anthers – here the yellow, male element of the flower. And just to make the point again, here is a polyanthus with seven petals. It’s not an easy geometry to spot in nature but I have also noticed it a number of times with the division of the spokes on car wheels. Why this should be I have no idea. Perhaps somebody would tell me…
Three and nine point


It appears that six-point geometry can be discovered all over the natural world, and is readily found almost wherever you choose to look for it. But it seems far less easy to spot three- and nine-point geometry which you might expect to be similarly readily apparent, though it appears to be that they are not. Unfortunately I know little about botany and have no idea why this apparent lack of three- and nine-point geometry might be so, though I suspect there may well be a sound reason for it. Obviously the majority of clover leaves fall into the three-point geometry form, and of which there are rare famous four-leafed forms. An example of the three-leafed form is shown in the upper of these two photographs, and below it there are two plants that exhibit nine-point geometry. Firstly, there is a lewsia flower displaying its nine petals. Unfortunately, this particular specimen is not as regular as I would have liked but, nevertheless, it has a satisfying balance to its symmetry. Below it is another plant, which I believe is a celandine, that also shows nine-point geometry as its basis, and in this case, with a more geometrically accurate display.
Four and nine point

There are a number of images above of flowers that have four petals, but this image of a member of the poppy family has been included at this point as, although it has four strongly marked divisions to its petals, its stamen can be seen to have nine symmetrical divisions to it. This illustrates the fact that it is not uncommon in plants to see numerical combinations of divisions that relate unusually. In this example it might be anticipated that there would be a relationship between four with six, eight or twelve, but not nine. In fact poppies demonstrate a variety of divisions in their stamens, as can be seen below in other photographs of the heads of poppies.
Ten point


There are a significant number of plants that exhibit five-point divisions in their geometries, a couple of which are illustrated further up the page. It follows that it is also very common in nature to find plants which are divided into ten divisions. Here are three photographs which illustrate this form of divisioning in commonly fond fruit.
The first shows ten segments of a peeled and opened tangerine, though I should add that it is relatively common to find variations to this rule as it is to many other types of plant. The second and third photographs are of two different varieties of melon, the photographs being taken of their ends. The first melon demonstrates a very even set of ten divisions, reflected inside with the organisation of its flesh and seeds.
The second is far more complex but has the same ten ten divisions. However, the patterning is more difficult to discern due to the character of the raised markings on the skin. Although the markings appear to be random, you should just be able to make out divisions along the surface radiating from the end, though they are not as regular as the divisions on the melon above. I have no idea what governs this. Perhaps somebody could tell me…


Below it are two photographs of the petals of a Passiflora caerulea. Note that although there are ten petals, the central part of the flower has five divisions and it has to be assumed that the two divisions – created by five- and ten-pointed geometries – may be found together in nature in the same plant. This may seem obvious and will have much to do with the sizing of elements of the plant.
Incidentally, there is an additional point to make here. Some plants combine a mixture of geometries at their base. Looking at this flower in more detail, not only is there five-point geometry, but an element of three divisional geometry where the brown stigmas sit over the green and yellow fruit pod. I believe too, that there are seventy-two purple filaments. This would mean that there are three-, five- and ten-point geometries found together – assuming that seventy-two is related to three-point geometry. How the seventy-two is made up, I have no idea; it could, of course, be based on three-, four-, six-, eight-, nine-, twelve-…
This complexity is reflected in man’s design work when five- and ten-pointed geometries may exist side by side and, as you will see from some of the examples further up the page, also can be worked with four- and six-pointed geometries to great effect. This is the basis of much of Islamic geometrical design. In fact Islamic designs may have a number of different bases for its geometry, their integration being a factor of the patterns selected, natural inter-relationship and the skill of the designer.
Eleven point


While a designer is free to make selections based on a variety of rules of his or her own determination – which may be either deliberate or even accidental, but which imply a degree of control or selection and conscious decision-making – nature often produces accidents in its geometries due to a variety of reasons over which there is little or no control. A few examples of this can be seen illustrated both above, and below.
This group of four photographs are all of poppy heads, the first exhibiting ten divisions which is the norm for this species. Obviously this is similar to the five divisions but the ten divisions are very much a feature of traditional geometrical designs and, of course, are both related to the Golden Section or Mean as will be discussed later.
It is interesting to note that although it takes a little time to count the number of divisions, this can be rapidly and accurately guessed at a glance and easily distinguished from twelve divisions with little or no practice.
The second and third photographs are examples of one of nature’s many little eccentricities, poppy heads of eleven divisions found hundreds of miles away from each other. To illustrate how these eccentricities seem to be found everywhere, the lower two photographs are of poppy heads found side by side on the same plant. The upper of the two can be seen to have eleven divisions, whereas the lower is divided into twelve.
Thirteen point


It seems that wherever you look at plants, there is something that catches your attention. Here are two photographs, the first taken a year after the first of the fourteen-petalled plants below, this having thirteen petals. I wasn’t looking for this, but the slight eccentricity caught my eye in both of them. I must go back and look at more of the flowers to see how many other variations in petals there are. What is interesting is how easily the eye spots these oddities, and yet how normal they seem, perhaps as they are not perfectly symmetrical in their shape and size of leaves. As a visual exercise, look at these thirteen-petalled flowers and then at the fourteen-petalled ones below and you should be able to see almost instantly how one has an odd number of petals the other an even number, without knowing the exact numbers of petals.

Here is a photograph of the base of a pine cone which also shows thirteen curved rows, but with them spinning in an anti-clockwise direction. Looking at a small selection from different trees in different locations, they all exhibited the same thirteen rows when it might be anticipated that there would be a number of variations in their number. There is an illustration on a different page of these notes showing the base of another pine cone exhibiting the same geometry.
Fourteen point


These two photographs of large daisies show fourteen-petalled flowers. Looking at the top one carefully I decided it hadn’t originally had fifteen, but that fourteen was its normal state. However, it is obvious from some of the photos seen here that there can be a number of different divisions of the same type of plant, and that few plants with many divisions consistently show the same number. Variations happen in nature and this, together with natural eccentricity of shape and placement bring increased interest to the plant, as in this example. The lower photograph shows two fourteen-petalled flowers, these being part of the same plant which had two thirteen-petalled flowers illustrated immediately above. It seems this flower is prone to many variations in the number of petals it displays, yet casual viewing suggests there is no variation.
Fifteen point

A little way up the page there is a photograph of a tangerine displaying its ten segments. Here is a satsuma that is comprised of fifteen segments. Another of the same purchase of satsumas had fourteen segments, so illustrating something of the variation that is possible within a group of natural plants, in this case, fruit, but a characteristic that can be seen in many of the petal arrangements of flowers. Like many of the divisional elements shown here, the segments can be seen to be of unequal sizes and that, also, is a characteristic of much of the natural world.
Sixteen point


Although there is an obvious connection to plants having sixteen divisions to those with four or eight divisions here, for example, is a flower having sixteen petals laid out in an almost accurate distrubution. The same plant had a number of similarly divisioned petals, all of them displaying similar accuracy in the positions of the petals.
But while the first photograph is here to record the layout of the petals of yet another plant, there is, within the head of the same flower, another piece of natural geometry worth noting. Surrounding the inner disk of the head of the flower is a grouping of anthers. One of these can be seen opening out – and it is clearly divided into five parts. It is interesting to see how different geometries can be found within the same plant.
Other divisioning


This first of these photographs show yet another white flower, this time one having seventeen petals. The photograph below it, of two pink flowers, show they exhibit a different number of petals on the same plant. In this case there are, from left to right, nineteen and twenty-one petals on the two heads, though they may appear on casual inspection, to have the same number. With this number of petals it is unlikely that the argument suggesting that variation creates interest, will hold good, though it may well be significant with a smaller number of petals, exhibiting a lack of balance that will keep the eye more interested when close to the flower heads. It is evident that a number of plants show considerable variation in the numbers of petals they display.


As the number of divisions of a plant increase there seems to be an increasing incidence of eccentricity. That, coupled with natural departures from the perfect form or placement, makes it increasingly difficult to count the number of divisions. These two photographs, of a dandelion and a large daisy, illustrate how there appears to be a strong geometry driving the form, yet how the eccentricities make it virtually impossible to suggest a definite figure for the number of divisions of either of the flowers. I had anticipated that, even with eccentricity, the number of petals would fall on specific numbers, and that these might be found within a system such as the Fibonacci series, but this appears not to be the case, even on the same plant. It does, of course, create more interest for those looking for patterns.
What I find interesting in these cases is the resemblance there is to the conscious or subconscious study of Islamic patterning; not in the accuracy of their geometry, but in the irregularity and lack of conformity, a similar characteristic to the manner in which Islamic patterns encourage the eye and mind to wander in exploration of the geometry driving their forms. Although flowers have a discrete number of petals and Islamic patterns have implied continuity outside their actual fields, there still seems to be a similarity.

But not all elements in nature, in this particular case, flowers, have geometries radiating from a single point in straight lines. This is discussed on the previous page, but I will add a couple of images to show there is more to be looked at than the more regular geometries above. Nor is it just plants that can illustrate radial patterns; snails are a very common example, this shell illustrating rotation clockwise from the centre.

Here is a photograph of a flower that has petals which can be seen to be spiralling outward. Obviously this has a lot to do with the mechanical requirements the flower needs to move its petals from a closed to an open position, but in doing so it provides a more complex appearance for us to appreciate even if, as in this case, the geometry is not strictly regular in the terms of the flowers I have illustrated above.

By contrast, here is a detail photograph of the florets of a cauliflower. The florets grow on a fractal basis, but do so in a spiral manner which can be seen here, though the geometry is not a regular as in some of the plants above. A pentagonal pattern can be discerned, but you should be able to make out that there are eight spirals moving clockwise – though I am not too sure how many there are moving anti-clockwise. It will either be five or thirteen. I think it’s the former, though I should know better…

Finally in this area of the notes, here is the readily recognisable seed head of a dandelion. An attempt was made to count the number of individual seeds on the heads of a couple of dandelions in the same area but it proved impossible. Nor was it possible to work out the geometrical setting out of the seed head which has to be looked at three dimensionally and, most probably, at a number of seed heads in order to discover the pattern or patterns governing their numbers.
Perfection
I intend to write a little more about this sometime, but it might be useful to place a marker here on the issues relating geometry and divisions to the concept and desire for perfection. Islam clearly holds that there is only a single source of perfection and that, although perfection may be sought in all things, tradition appears to be that it is a reflection of an inner perfection, ihsaan, but may not be attained by man. It is a commonplace that tilings, carpets and other areas of artistic endeavour have built into them eccentricities or obvious mistakes in order that it will not be thought their authors believe they can produce perfect examples of their different arts. In a sense this practice replicates nature with its wide variety of variations from the norm or from perfection. Yet modern production methods strive for a degree of accuracy that might be thought to represent perfection.
A diverse collection of authors have held that perfection, though it may be an end in itself, leads only to sterility and mediocrity. This seems to be particularly true when we look at the increasing ability of modern equipment and techniques to produce accurate products. The Victorian writer and critic, John Ruskin, John D. Sedding of the Arts and Crafts movement, Christopher Alexander and, even, Shakespeare, for instance have all held that the search for perfection in art misunderstands its meaning, and is likely to mar what is good.
But the reason I make this note here is that while geometry has an obvious mathematical precision to it, the artistic work that uses it as a basis for design can not hope to achieve the same degree of accuracy by virtue of the materials that are used. In a sense this is reflected in nature, particularly when you look at the example of the flowers above; none is perfect, but all have a beauty in their essence and variation. This is true, too, of work such as Qatari naqsh, Moroccan tilework and Persian carpets. Works such as these compare and contrast favourably with, for instance, the modern tilework that is being used to decorate new buildings and can appear sterile, if not soul-destroying, in its accuracy of production and execution.

To illustrate something of the concept of perfection, here is a modern example of a geometrically laid out pattern that has a liveliness about it which is unusual when compared with traditional designs. Apparently constructed of coloured marbles and mother-of-pearl, it is not geometrically perfect. The piece is a one-off design, around 500mm or 600mm square and it would be assumed that it would have to be accurately laid out in order to achieve what is a relatively complex design. To this end, all the pieces are cleanly cut and their junctions are well organised, the pieces fitting tightly together. It would appear to reflect the designer’s intent to create an interesting work dependent on accuracy and considerable variation in the materials. Yet it is immediately obvious on casual inspection that this is not a true geometrically accurate design and can not be perfect. Having said that, it is certainly extremely attractive.

In this illustration I have taken the original photograph above, and mirrored it in order to produce an image with a central focus incorporating four quadrants. This resulting image illustrates better the points I want to make with respect to the original design, though I have not corrected eccentricities in the colouring of the material from which the design is made.
What is immediately apparent are the lack of symmetry as well as the mobility within the design. The latter has much to do with the selection of materials from which the piece is made, but also on the eccentricity of the layout, these two aspects creating a lively design which contrasts dramatically with traditional Islamic, geometrically organised designs, yet seems similar to them. However, because of the lack of symmetry in the design, it is not an easy design to analyse.

The most obvious distortion, contributing considerably to the eccentricity of the layout, can be seen in this detail. Four of the five concentric 16 point stars at the centre of the design are not symmetrical. The outer, largest one – shown in pink – is symmetrical but, as they decrease in size, their centre for setting out moves away from the centre of the overall pattern. This can be seen at its extreme in the central star – shown in white and means that the centre for setting out those parts of the nested stars in the upper right quadrant design lies in the bottom left quadrant, approximately where there is a white cross. The other three quadrants would be, respectively, similarly centred.

At first glance, the rest of the design outside the nested central stars appears to have been established accurately, based on sixteen divisions radiating from the centre of the four quadrants. This enables the rest of the design to be developed utilising bands of varying width, again increasing the visual interest of the pattern and most obviously understood in the first photograph above where their varying widths increase the fluidity of the overall design.

Also unusual in this design is the shape of a number of the elements which make up the pattern. You would anticipate that they would be geometrically accurate and relatively simple in line with the usual way in which these designs are constructed. While there can be re-entrant angles it is not usual to have them shaped as the bottom end of the central pink tile is shown here. If you look at the first photograph you can see this is a design feature and not a mistake.

However, the feeling of accuracy when looking at the overall design is misplaced. If you take an element of the design, as shown here to the right of the diagonal line, and reflect it about that line which has been drawn from the perceived centre of the overall design, then it can be seen that there is no true reflection. Why this is so I have no idea other than that the construction was incorrectly set out accidentally or deliberately. But despite this eccentricity the design retains an apparent coherence in keeping with traditional Islamic design principles – though it is anything but perfect – while still being extremely effective in its overall appearance. Perhaps it should be considered more as a work of art than as an example of Islamic design.
more to be written…
Shape and balance

One point to note, illustrated to the side here, is that flowers and plants that have an equal number of petals or elements are usually understood to have a more balanced form, whereas those with an odd number appear to be more active. If you compare the six and five sided figures you should see what I mean. Even sided figures look balanced, secure and strong while odd sided figures appear disbalanced, in motion, perhaps more exciting.
This is a normal psychological function of the manner in which we understand objects. If you look at these two shapes on the following two diagrams, the top diagram illustrates a shape with an odd number of sides, the lower and even number of sides.


The upper shape on the left seems more active while the lower one on the left feels solid and well balanced. But you can see in the right hand example of each shape that by balancing them on a point rather than a side, they both seem more active – or unstable, depending on how you view them. The point to bear in mind is that we automatically read two-dimensional shapes as having qualities or characteristics they don’t have in reality: an implied gravity. This character of shapes can be observed, consciously or unconsciously in the design of everything we see and affects the manner in which we understand them. It is something that designers bear in mind as an element of their design vocabulary. However, in repetitive geometric pattern we appear to lose that sense of weight and, in most patterned work we experience a weightlessness in the overall design. This is a quality which lends itself to contemplation and is very much in tune with an Islamic view of the world. More has been written on the Perception page. But I digress…
Pythagoras’ theories were developed in the Arabic world by, among others, a group known as the Brotherhood of Purity – Al Ikhwan as-Safa’ – in tenth century Basra. The Brotherhood placed emphasis on the numbers one, four and seven. While the intellectual advances in mathematics and numbers was effectively located on the east of the Mediterranean, the more utilitarian development of numbers was taking place in Spain. However, these skills and relationships travelled throughout the Islamic world and it has to be anticipated that they would have formed a basis for construction in most of the Islamic world.


I didn’t intend to write about Islamic geometry related to modern art and design. Nevertheless, I thought it useful to include at least one photograph to illustrate a modern artistic installation that is specifically based on Islamic geometry. The top of the two photographs is a straight elevation of half of the work, the lower was taken at an oblique angle. The piece is by Monir Farmanfarmaian and is very much related to her homeland, Iran. It is constructed of mirror mosaic of which there is a strong tradition there. This is only half the installation and each consists of three panels, each panel 1350mm wide by 1830mm high. It illustrates how, through geometry and the facetting of the mirror mosaics, a complex work can be constructed.

This third photo shows three separate details from the above work. It shows how the six-pointed geometry of this part of the work has resulted in three very different patterns. These designs are some of the most basic forms and can be found in Islamic work all over the Arab world, fabricated in a number of different materials. The advantage of mirror mosaic is that it reflects light as well as the colours of the space in which it is situated.
Harmony
Thus the Islamic building can be seen to incorporate within it both the essential harmonies of nature together with various symbolic meanings, fixing them in its man-made structure. At their finest, these buildings are more powerful spiritually than are their Western counterparts. Where Western architecture takes its inspiration from traditional construction and theories of perfect proportions, Islamic architecture is created of a whole whose elements are defined through a series of relationships with nature and natural surroundings.
This surface treatment can be seen to have three characteristics, those:
- resolving themselves around the issues of symmetry, those
- which might be thought to relate to the metaphor of textiles, and those
- incorporating what Jay Bonner refers to as self-similar design.
This latter form – the repeating of the main pattern at a smaller scale in the background – is not found in traditional Qatari naqsh design but is typical of the more sophisticated work found in Persia, Turkey, Egypt, Morocco, and Andalusia.
Symmetry
There are many ways of understanding symmetry. In these notes it is likely that I will mix some of them, for which I apologise if it is found confusing; those needing to know more about the subject should look elsewhere. Here I wish to write about it in both its general and specific geometrical meanings.

At its most basic, symmetry refers to a geometric quality where there is a precise balance that can be described mathematically. Commonly this is taken to be a correspondence of shape about an axis, central point or plane. This diagram illustrates the four basic methods by which symmetry is achieved. There is more written about this on the following geometry page where the seventeen basic patterns relating to symmetry are discussed in a little more detail.
In the natural world there is argued to be a tendency towards the achieving of symmetry in all its aspects. Symmetry is thought to be beautiful with a character illustrative of completion, an end to be sought. Though we can observe it visually, symmetry is best described in mathematical terms. More than this it is thought that the nearer a mathematical theory can be described by a simple declaration, the more likely it is to be correct – an area of study that continues to focus the attention of mathematicians and physical scientists.
But it is in asymmetry that we often notice the beauty of symmetrical designs, for while the eye is drawn to eccentricities, it tends to prefer perfection to imperfection. The issues here also relate to a state of mind; symmetry and perfection lead to a relaxed, peaceful and contemplative state of mind whereas asymmetry heightens observation, leading to a more interested state of awareness, one more focussed on what it is looking at and, by definition, less relaxed.
As I have mentioned elsewhere, there is an extension to the arguments about perfection in Islam where it is considered that man is unable to produce a design that is perfect, the consequence of this being a degree of imperfection that traditionally is built into designs. But this is not a concept that is peculiar to Islam; the same concept exists in other parts of the world, for instance, in Japan where it was written, in a 14th century essay on idleness:
In everything…uniformity is undesirable. Leaving something incomplete makes it interesting and gives one the feeling that there is room for growth… Even when building the Imperial palace, they always leave one place unfinished.
As you can see, this is not a consideration brought about by religion, but one having to do with aesthetic appreciation, a phenomenon that resonates in many areas that govern the way in which we perceive the world about us.
Symmetry can be defined in terms of grid and detailed design, and although there are only seventeen basic pattern arrangements, there are an infinite number of patterns that can be developed from them. All around us we see the manner in which these patterns are developed to adorn and decorate. It should be understood that a pattern is symmetric if there is at least one symmetry (rotation, translation, reflection or glide reflection) that leaves the pattern unchanged.
The geometries which are associated with patterning of finishes such as tiles are also often related to the three-dimensional forms of building in Islam just as it has been in some Western buildings. It might be, however, that there is a more important function for geometry in relating the building both in its proportions and spaces with the more spiritual functions of Islamic architecture – particularly, therefore, the architecture of the mosques and schools (madrassat), but not necessarily of the residential buildings that account for the major part of traditional Islamic urban developments.
As mentioned previously, the metaphor of textile in the decoration of Islamic architecture is one which appears to have some relevance. The form of the decoration, in this case, can be divided into two forms: free-flowing, and tailored. At its simplest free-flowing patterns can be seen to be draped over the underlying forms of a building, in the latter patterns are organised to be constrained by – or, alternatively, to define – architectural elements of a building.
It is likely that the sophistication suggested by the development of geometries in building complexes such as the Alhambra in Moorish Spain did not find its way to the Gulf. Perhaps more surprising is that there is seems to be no suggestion that the Turkish occupation had any design influence, though it may have come about in an unconscious manner. I know of no attempt to investigate it, and the majority of the old mosques in Qatar have been demolished to make way for newer, larger developments. The most likely design influences are, of course, from what is now Iran as the majority of builders appear to have originated there.
Intellectual basis of design
It is generally recognised that the Alhambra was not the invention of its builders but the product of the intellectual workings of at least two of the Grand Viziers, Ibn Khaldun probably being the major contributor. Mathematics and geometry were normal considerations of intellectuals of the period. The integration of poetic writings with the geometric patterning and architecture suggest that the builders were strongly directed in their work.
On simpler buildings the builders would have been more easily able to integrate the two- and three-dimensional requirements of their buildings by themselves, and this is my experience observing them in the Gulf.
more to be written…
Arabic / Islamic geometry 02 | top | Arabic / Islamic geometry 04
Search the Islamic design study pages
- Introduction
- Arabic / Islamic design
- Arabic / Islamic geometry 01
- Arabic / Islamic geometry 02
- Arabic / Islamic geometry 03
- Arabic / Islamic geometry 04
- Islamic architecture
- Islamic urban design 01
- Islamic urban design 02
- Islamic urban design 03
- Islamic urban design 04
- Islamic urban design 05
- Arabic / Islamic gardens
- Gulf architecture 01
- Gulf architecture 02
- Gulf architecture 03
- Gulf architecture 04
- Gulf architecture 05
- Gulf architecture 06
- Gulf architecture 07
- Gulf architecture 08
- Infrastructure development
- The building industry
- Environmental control
- Perception
- The household on its lot
- A new approach – conceptual
- A new approach – principles
- A new approach – details
- Al Salata al jadida
- Public housing
- Expatriate housing study
- Apartment housing
- Pressures for change
- The State’s administration
- Society 01
- Society 02
- Society 03
- Society 04
- Society 05
- Society 06
- History of the peninsula
- Geography
- Planning 01
- Planning 02
- Population
- Traditional boats
- Boat types
- Old Qatar 01
- Old Qatar 02
- Security
- Protection
- Design brief
- Design elements
- Building regulations
- Glossary
- Glossary addendum
- References
- References addendum
- Links to other sites