
a collection of notes on areas of personal interest
The two battles at Bullecourt, northern France – Spring 1917
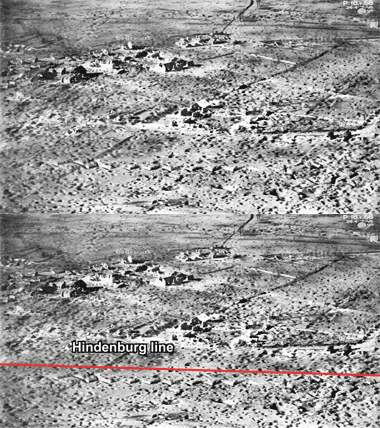
The village of Bullecourt is situated on the flat landscapes of Picardy, north-eastern France. Located about twenty-five kilometres south-east of Arras and thirty kilometres west of Cambrai, it became the site of two of the battles in the Arras campaign. There a combined force of British and Australian soldiers of the Allies’ 5th Army, most of the British being conscripts, were faced with a force of professional Prussian troops entrenched within the Hindenburg line.
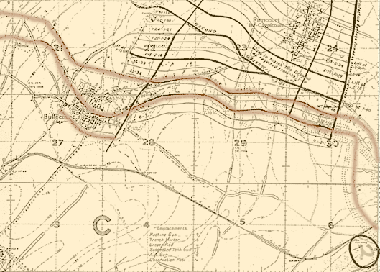
In the aerial photograph above you can see some of the damage created by the artillery bombardment of Bullecourt. Taken on the 24th April 1917, the photograph shows what remains of the village and, in the foreground, the articulated trenching of a part of the Hindenburg line can be clearly seen below the red line.
To the side is a map of Bullecourt and Riencourt. Bullecourt is the urban development seen to the left centre on the map, with Riencourt toward the top right edge, north-east of Bullecourt. The map illustrates their position within the Hindenburg line, showing how it was used to form a defensive stronghold on this relatively flat terrain. Bear in mind that although the land in the region is generally flat, it slopes away to the south where the Allies were positioned. Note too, that there is a re-entrant on the south-east of the line, the area into which the Australians were directed and where they were they could be subjected to enfilading fire.
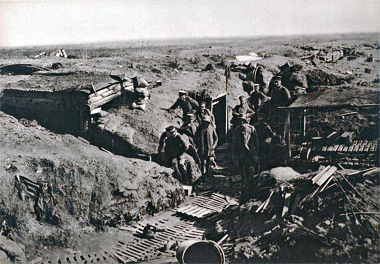
The third of these three images is said to have been taken in March 1918 – though Wikipedia suggests 1917 – and shows German troops examining a captured British trench in the region of Bullecourt. The image was distributed for propaganda purposes and is undated, but the legend reads ‘The great battle in the West. Stormed English lines at Bullecourt - Croiselles’. Below the original photograph the viewer is urged to buy war bonds.
The battle of Arras
The two battles of Bullecourt, the German attack on Lagnicourt, and actions on the Hindenburg line were flanking battles in support of the battle of Arras on the Bullecourt flank. A full listing of the battles of the First World War can be found here, which has the benefit of setting out more clearly the battles and the elements of the Allied Armies, Corps, Divisions and Brigades.
By this stage of the war, the different armies had been drawn into an impasse stretching from Switzerland to the Channel. The tactics, relying heavily on trenches and attritional warfare, created dramatic urban destruction, heavy casualties, and national hardship on both sides of the line. The superior numbers of Allied troops were unable to have a significant effect on the Axis troops with this form of warfare, and both sides cast about for innovations which might create the breakthrough they required to win.
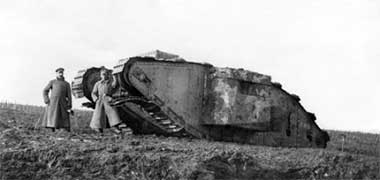
The Allies needed a breakthrough to enable them to engage in the more flexible warfare which they believed would be to their advantage with the numerical superiority they enjoyed over the German troops. They believed this might be best effected by the use of counter-battery attacks and rolling artillery barrages combined with the new weapon, recently introduced, the tank, this one showing damage caused to the front with two German officers having their photographs taken in front of it.
Tanks
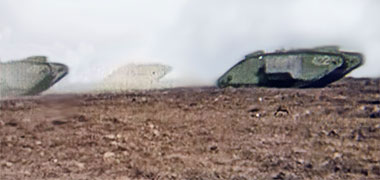
Regrettably, the tank proved of limited use as it was slow moving, both poorly armoured and armed, and difficult to manoeuvre. Although this could have been foreseen, nevertheless tanks were introduced into the battlefield though few managed to have a positive effect on its outcome. The noise and heat inside them proved extremely uncomfortable to their crews. They were extremely cumbersome in operation and prone to breaking down as well as suffering from the faults previously mentioned, all contributing to making them extremely dangerous for their crews.
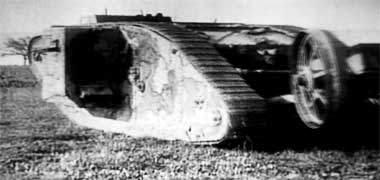
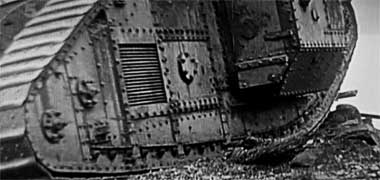
Despite this, tanks must have had a strong psychological affect on those witnessing them for the first time, particularly when moving into action. But a negative factor was that, being a novel weapon, it was not clear how they might best be deployed, and there was considerable debate relating to tactics due, in the main, to officers clinging to the traditional roles and tactics relating to cavalry, as these were now the branch of the army in command of the new weapons. At Bullecourt, their late arrival due to inclement weather prejudiced the Allied attack and increased infantry troops’ distrust of them as a useful element of a battle plan. It wasn’t until after the war that Captain Liddell Hart wrote about theories of war including strategies relating to tanks and how they might be used to best effect, theories which were largely ignored by the British but were taken up successfully by the Germans in the Second World War…
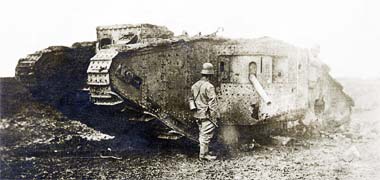
There are two other points which need to be made with regard to these tanks. Those used at Bullecourt were the Mark II type, essentially a training tank and characterised by its armour not being case-hardened as was developed later. Knowing that the tanks were insufficiently armoured it is significant that the British command nevertheless chose to send them into battle. However, there may have been a strategic advantage gained as the Germans, having tested their weapons on the tanks, and discovering them to be vulnerable, might have been taken by surprise when the later, Mark IV case-hardened tanks were used against them.
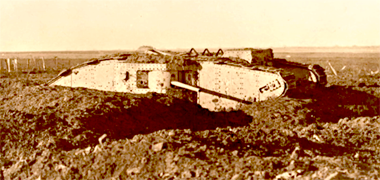
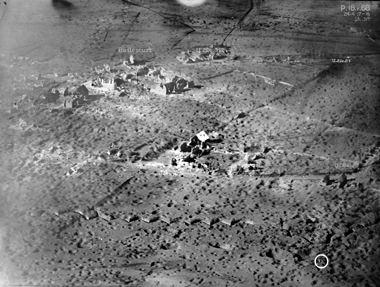
This image, which looks approximately south-west, was taken by a German photographer and is of the British Mark II Male Tank 796, commanded by Second Lieutenant Hugh Skinner, the tank that managed to travel the furthest towards the German lines at Bullecourt. As mentioned above it was a training tank, its insubstantial armour giving protection only to small arms fire. Painted British Racing Green and firing 60mm shells, it was being hit with 77mm shells from the German side and eventually stopped, its crew using all their ammunition before being immobilised.
This aerial photograph, which is essentially the same as that at the top of this page and taken on the 24th April 1917, illustrates how close the British Mark II Male Tank 796 was able to push forward to the German positions. A white circle marks the tank’s final resting place, the German trench being only a few metres further forward.
At the age of twenty-four and having previously served and been wounded in Gallipoli, Second Lieutenant Skinner survived the engagement and was awarded the Military Cross, later rising to Captain, retiring then re-called to the Second World War as a gunnery instructor.
Heavy artillery
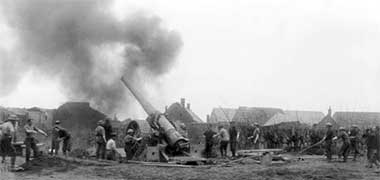
The infantry troops were open to attack not just from their opposing infantry, but particularly from the long range batteries using heavy guns. Here a 6 inch naval gun is being used from Beaumetz to support the Australians in their attack on the east flank of Bullecourt. These guns were situated miles away from the front and caused considerable personnel and collateral damage.
In order to deal with the threat posed by these heavy guns, considerable effort went into spotting their location by the flashes and noise they made when fired. Some of this work was carried out from the ground but with little effect, and some from the air by the recently formed Royal Flying Corps. Unfortunately, March 1917 saw the arrival of von Richtofen’s squadron of aircraft which had a decimating effect on the Allied aerial efforts with April 1917 witnessing considerable losses, von Richtofen being personally responsible for shooting down twenty-two aircraft.
The combination of these factors made the counter-battery operations tenuous, effectively increasing the amount of incoming shells from behind the German lines.
The creeping barrage
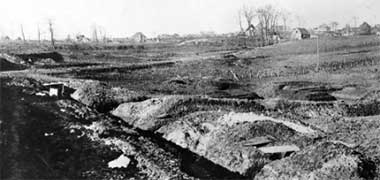
The creeping barrage was not a new invention but was used at Arras. It was an attempt to facilitate the movement of advancing infantry by laying down an area of continuous explosions which moved ahead of them. It was designed to destroy barbed wire systems and keep German troops in their trenches and tunnels in order that they could not expose themselves and fire at oncoming troops. While the theory might have been sound, the practice was not. There were three factors which militated against the effectiveness of this form of attack support.
Firstly, there was the general problem of timing. In theory the barrage would keep about a hundred yards ahead of advancing troops who were trained to advance at a standard rate. Advancing over shell-pocked land with a variety of additional obstacles – including shell holes – created an irregular line which tended to make the barrage move too far ahead, giving German troops the opportunity to move to their positions and attack the exposed infantry. This happened at Bullecourt.
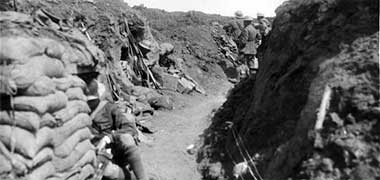
Secondly, communications were sometimes difficult as they relied on motorcyclists and wires to pass messages. These wires were easily cut and so intelligence was not always communicated in a timely manner making the integration of the creeping barrage and advancing infantry movements problematic; and much else, of course. This photograph, taken in a trench of the Hindenburg line at Bullecourt, shows communications wires on the right of the trench.
The third factor was a combination of guns and their shells. The barrels of the guns deteriorated with use and had to be regularly re-calibrated in order to retain their accuracy.
The shells fired by the guns relied on their fuses to explode on impact. The British fuses had two defects, probably caused by their rapid design and deployment. They were prone to prime themselves accidentally, causing a number of shells to explode in the barrels of their guns or just after discharge. Their second problem was that they tended to explode too far into the ground, limiting their effect above ground. These two problems were resolved later in the year by the introduction of a French fuse with a number of safety devices built in, and which exploded nearer ground level.
Nivelle offensive
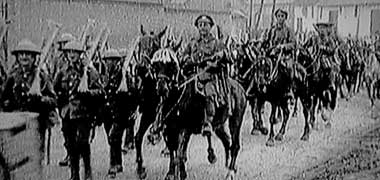
The French had suffered from the war taking place on their land and the nation had become increasingly disenchanted with its progress, or lack of it. This was particularly so with Joffre’s handling of the Somme, which led to his being replaced by Nivelle who had cheered France by recapturing much of the ground previously taken by the Germans at Verdun. Nivelle’s plan was to attack not where Joffre had intended to develop the war, but further south.
However, the French government had again changed and was no longer supportive of Nivelle and his planned offensive, but by threatening his resignation which would have had serious consequences on the prosecution of the war, Nivelle was allowed to continue with his planned attack.
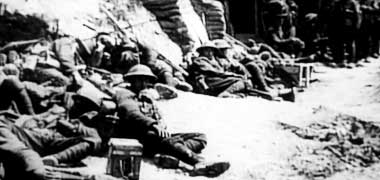
The Arras offensive has to be understood in the context of the overall Allied battle plan. This was for both the Arras and Nivelle offensives to achieve a breakthrough and then link. The plan was conceived with the French who were simultaneously planning to attack the German line eighty kilometres south of Arras, an operation known as the Nivelle offensive. Although the layout of these notes might imply it was a lesser operation, it was in fact a massive attack compared with that at Arras. The operation involved 1.2 million troops but the Germans learned its details and, rather than the estimated losses of ‘only’ 10,000 troops and the completion of the exercise in forty-eight hours, more than 185,000 died in the Nivelle offensive. This created a significant wave of unrest in the country, resulting in mutinies and the dismissal of General Nivelle.
Order of battle at Bullecourt
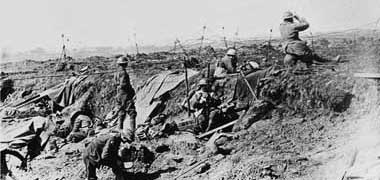
The line at Bullecourt was occupied on the German side by the 20th Infantry Regiment of the 27th (Württemberg) Division. To the left of the 62nd Division was a battalion of the British 7th Division facing elements of the German 49th Reserve Division. To the right of the 62nd Division was the 4th Australian Division of the 1st Anzac Corps who faced the 123rd Grenadier Regiment. This photograph, taken in April 1917, shows artillery observers sighting for an Australian battery at Bullecourt.
The German troops came under the command of Crown Prince Rupprecht of Bavaria, considered to be an extremely capable soldier who, in August 1916, had been promoted from command of the Sixth Army – that command being taken over by Generaloberst Ludwig Baron Von Falkenhausen who was, in turn, replaced by General der Infanterie Otto von Below in April 1917 – to Generalfeldmarschall commanding the new Crown Prince Rupprecht Army Group which consisted of the First, Second, Sixth and Seventh Armies, and the defensive duty of holding the Hindenburg line. In March 1917, the Seventh Army was withdrawn from his command and the Fourth Army added making him responsible for the whole of the northern German line from the Belgian coast south to the Oise river.
The first Battle of Bullecourt took place on the 11th April 1917 and involved the British 62nd Division of the 5th Corps and the 4th and 12th Brigades of the 4th Division of the 1st Anzac Corps, both of the 5th Army under the command of General Sir Hubert de la Poer Gough.
Between the two battles of Bullecourt, there was action with the German attack of the 15th April 1917 at Lagnicourt which involved the British 62nd Division and the Australian 1st and 2nd Divisions of the 1st Anzac Corps, again, all of the 5th Army.
In the second Battle of Bullecourt, which lasted from the 3rd to the 15th May 1917, the British 7th Division was augmented by 58th Division, and the Australians by their 1st, 2nd and 5th Divisions of the 1st Anzac Corps, all of the 5th Army.
Following the second battle of Bullecourt there were continuing engagements from the 22nd May to the 16th June 1917, along the Hindenburg line with action by the 21st and 33rd Divisions of the 7th Corps of the 3rd Army under the command of General Edmund Henry Hynman Allenby, together with the 7th, 58th and 62nd Divisions of the 5th Corps of the 5th Army, and the 5th Division of the 1st Anzac Corps and the 20th Division of the 4th Corps, both of the 5th Army.
The 3rd and 5th Armies of the British Expeditionary Forces, together with the 1st Army under General Henry Sinclair Horne, were under the command of Field-Marshal Sir Douglas Haig, though it was General Allenby who was responsible for the plan of battle at Arras.
The Hindenburg line
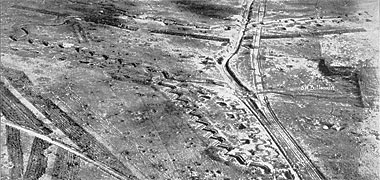
This aerial photo of Bullecourt was taken in 1920 and shows three sets of trenches, connected by communication trenches and, in the lower left corner, hectares of barbed wire protecting the first German line. The photograph was taken from west-north-west of Bullecourt and can be seen to cover a part of the southern area on reference 21 of the maps below.
As I mentioned above, there was, in effect, a continuous defensive German line known as the Siegried Line but, to the allies as the Hindenburg line. This was so named after the General brought in from his successful Russian campaign, along with General Ludendorff as his Chief-of-Staff, to lead Germany’s war, taking over from General Falkenhayn in August 1916. It was a heavily fortified line giving defence in depth as well as providing a series of fortresses and protected bunkers to give defenders a considerable advantage against their attackers. Its purpose was to shorten the bulge into France created by the German offensive.
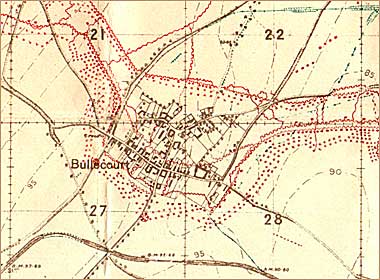
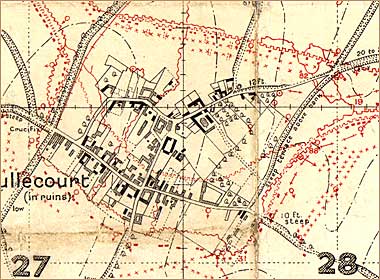
Bullecourt was used by the Germans as a strong point in the trench system they developed in their attempts to shorten their front line and so release troops for other activities. To the right is a general military plan of the village of Bullecourt showing the trenches of the Hindenberg line protecting it in the second battle of Bullecourt. The Germans occupied the area to the north of the lines, the allies attacked from the south.
The plan is a detail taken from an artillery map and illustrates two points relevant to the criticism made by many of this particular action:
- the general area into which the British and Australian troops attacked was a re-entrant of the Hindenburg Line giving the Germans the ability to enfilade the allied troops and, just as disconcerting
- the artillery plan at the top of the page demonstrates that the allied shelling was aimed at the trenches and support ground straight ahead, apparently avoiding the flanking, German lines from which the the Australian troops were at serious risk.
This part of the Hindenburg line was considered important enough for their to be a concerted effort by the Allied forces to attempt to break through at this point. Commentators believe that this was a mistake, particularly sending in the Anzac troops into the re-entrant to the east of the village.
The first battle of Bullecourt
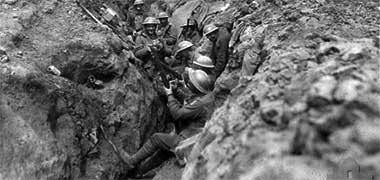
The purpose of the battle of Arras was to draw German troops away from the area into which the French would launch the Nivelle offensive to the south. Badly planned and hastily mounted, the first battle of Bullecourt took place on the 11th April 1917. The Australian infantry, supported initially by tanks and long-range artillery barrages, broke through the German lines but then were forced to halt due to the failure of tanks to support them – this due to their breaking down and vulnerability to attack – and to the failure of communications which, in not being able to communicate the Australian positions meant that the supporting artillery was halted, allowing the Germans to surround and overcome the attack. The Australians suffered heavy casualties and had 1,170 of their troops taken prisoner.
There is full account of the first battle of Bullecourt in the book ‘Bullecourt 1917 – Breaching the Hindenburg Line’ here.
The second battle of Bullecourt
Having failed once to take the village of Bullecourt, the Allies regrouped and began a second offensive in the early hours of the 3rd May 1917, the British attacking the village with the Australians attacking the German lines to its east. The fighting was fierce and slow moving. On the east of the village the Australian advance was halted by accurate machine gun fire though, as they had in the first battle, the Australians managed to break through but were confronted with an increasingly strong defence by the German troops.
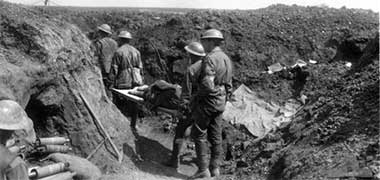
In the village the British troops advanced to the far side but strenuous resistance combined with confusion between the movements of the different units led to the British being thrown back and out of the village. Both the British and Australians then established defensive positions from which the battle continued for the next two days. In this photograph Australian stretcher bearers can be seen taking wounded back to a field hospital.
More troops were sent in to reinforce the attack and, on the 7th May, the Australian and British troops were able to link. This brought about fierce counter-attacks by the German troops which were continuously repulsed by the British and Australian forces who had now been able to occupy and reinforce the old German positions. Eventually, on the 15th May, the Germans withdrew, leaving the Allies in command of the village, a position which had no great strategic importance.
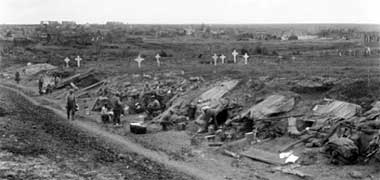
This photograph was taken a few days later on the 19th May 1917 and shows Australian troops billeted on the sunken road near Bullecourt, with some temporary graves marked by the white crosses.
At its simplest, the second attack on Bullecourt was carried out in a similar manner to that of the disastrous first, though with a little more planning, but no hindsight. Little account was taken of the enfilading machine guns nor of the continuing mistrust of the use of tanks and efficiency of rolling artillery barrages, though the Australians would have nothing more to do with tanks. Whether the attack should have taken place here or not is still questioned. It did have its intended effect in reducing the German capability of responding to the Nivelle offensive, but it was only at the cost of massive allied casualties.
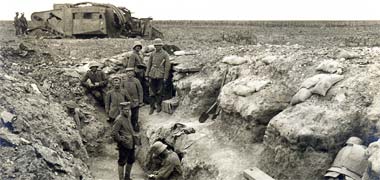
Meanwhile the Germans were able to move back, maintaining a series of defensive positions within the generally featureless countryside. This photograph, taken most probably later in the year, shows one of their command posts near Bullecourt integrating into it a British tank, destroyed on the 11th April 1917 in the first battle of Bullecourt, for camouflage. While features such as the tank could be used as camouflage, they had the disadvantage of being capable of use as markers for allied fire. Interestingly, the bottom right corner of the photo shows a set of trench armour. There is more information at the link.